
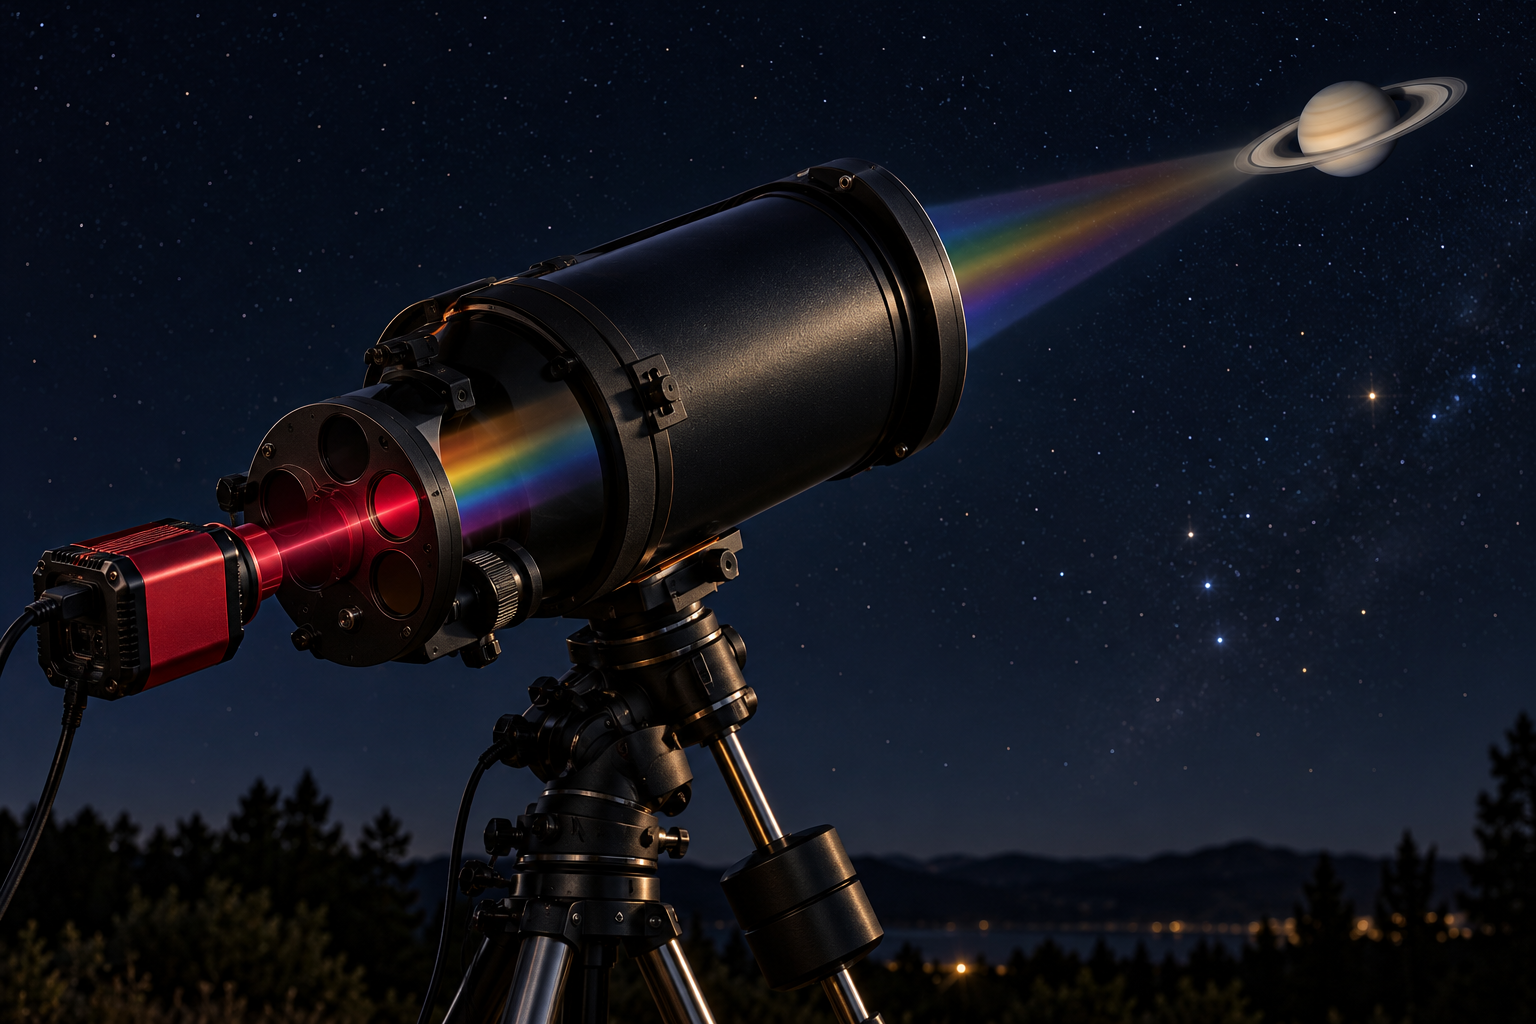
An IR-pass filter blocks visible light below a set wavelength, so a monochrome planetary camera records only deep red and near-infrared light. For planetary work the common choices start at 685 nm and 742 nm, and both trade some resolution and a good share of light for a steadier image in turbulent air. This Mac Observatory guide explains when each filter helps, what each one costs, and how to test them against each other on a Mac.
A planet can look soft and restless in visible light on a night of poor seeing, then noticeably steadier through an IR-pass filter. The atmosphere is still there. What changed is the band of light the camera records, and that shifts how turbulence, diffraction, atmospheric dispersion, the telescope and the sensor interact.
So the useful question is whether that steadier signal is worth the lost light, the longer exposures and the lower diffraction-limited resolution for your telescope, camera, target and conditions. I shot Saturn through both filters and through a luminance filter with the same camera, and those frames are further down.
Which IR-pass filter should you start with, 685 nm or 742 nm?
A 685 nm filter such as the Baader IR-Pass 685 is the more forgiving place to start. It passes more light than a 742 nm filter, which keeps exposures short and frame rates up, and that matters most on a dim target like Saturn or with a smaller aperture. A 742 nm filter rejects more of the visible spectrum and can make rough seeing less destructive, but it usually asks for longer exposures or more gain. Filters around 807 nm push the idea further and suit larger apertures and cameras with good near-infrared sensitivity.
Astronomik's guidance follows the same progression. The company says the poorer the seeing, the more sensible it is to suppress shorter wavelengths, and it recommends the Astronomik ProPlanet 742 for the Moon and planets, particularly Mars, with telescopes of 150 mm (6 inches) and larger. Its ProPlanet 807 needs at least a 250 mm (10-inch) aperture, because the stronger filtering leaves less light to work with. That's one manufacturer's advice for one filter family rather than a universal aperture rule, but it describes the trade-off well.
Each bar shows the band a filter passes. The fade on the right comes from the camera: sensor sensitivity drops through the near infrared.
The bars show where each filter starts passing light, not how much it passes. What your camera records is the filter's transmission multiplied by the sensor's sensitivity, and most planetary camera sensors fade out through the near infrared, which is why the bars dim toward 1,000 nm.
Why does infrared look steadier through the same telescope?
Turbulence distorts the wavefront arriving at the telescope by a certain physical amount. At a longer wavelength, that same distortion is a smaller fraction of a wave, so the image holds together better. Astronomers describe the scale of the turbulence with the Fried parameter, r0, roughly the size of a patch of air that stays coherent, and r0 grows with wavelength to the 6/5 power. Moving from green light at 550 nm to 742 nm makes r0 about 43 percent larger, so any given aperture spans about half as many turbulent patches. Going from 685 nm to 742 nm is a smaller step, about 10 percent.
That matters for lucky imaging in particular. David Fried showed in 1978 that the chance of catching a sharp short exposure drops steeply as the aperture spans more of those patches, so fewer patches means more usable frames from the same capture. Solar observers have measured the wavelength effect directly: Kamlah and colleagues compared image-quality metrics with r0 across visible and near-infrared sequences from the Vacuum Tower Telescope on Tenerife and mapped how both change with wavelength.
Longer wavelengths also shrink atmospheric dispersion, the prism effect that stretches a low planet into a blue-to-red smear. Air's refractive index changes fastest with wavelength in blue and ultraviolet light, which is why ESO notes that correcting dispersion is what gets round images in the UV and blue. That helps a monochrome IR capture, but it doesn't make an atmospheric dispersion corrector irrelevant to an RGB sequence. The red, green and blue frames still sit at different wavelengths and still separate when the target is low.
What do you give up with a longer-wavelength filter?
Diffraction works the other way. A telescope's diffraction spot grows in direct proportion to wavelength. On an 8-inch (203 mm) aperture like my Celestron EdgeHD 8, the Airy disk radius is about 0.68 arcseconds in green light, 0.85 at 685 nm and 0.92 at 742 nm. Those are cut-on figures, and most of a long-pass filter's light sits above its cut-on, so the real spot is a little larger still. Infrared wins when turbulence is the main problem and loses when the air is already steady enough for the telescope to approach its visible-light limit.
Between the two filters the trade is close. Going from 685 nm to 742 nm buys about 10 percent in r0 and costs about 8 percent in diffraction. The deciding factor is often light.
A higher cut-on throws away more light, and most planetary camera sensors lose sensitivity the farther they reach into the near infrared. If exposure time rises, the frame rate falls and each frame records a longer slice of the turbulence. More gain keeps the speed up at the cost of noise. Check the camera maker's quantum-efficiency curve rather than assuming two sensors behave alike. Player One publishes one for the Uranus-M, the IMX585 mono camera I used for the Saturn frames below.
You can win some of that light back. Longer wavelengths need less magnification to be fully sampled: the focal ratio that reaches Nyquist sampling works out to twice the pixel size divided by the wavelength. For 2.9 µm pixels that's about f/10.5 in green light, f/8.5 at 685 nm and f/7.8 at 742 nm. If your IR captures run at the same focal ratio as your color work, they're more oversampled than your color frames, and a shorter barlow (or none) brightens the image while still sampling what the aperture can deliver at that wavelength.
This is why "longer is better" fails as a rule. The filter, aperture, focal ratio, sensor, target brightness and seeing work as one system. The right filter is the one that improves the final stack, not the one with the highest number printed on its cell.
How do 685 nm, 742 nm and 807 nm filters compare?
Here's how the three common cut-ons line up for planetary and lunar work.
Which column fits you depends as much on the target as on the seeing.
Which planets benefit most from an IR-pass filter?
The Moon is the easiest place to learn, because it's bright and full of detail. Capture a red or luminance clip and an IR clip close together, then process both at the same output scale. Mars is a natural IR target too: its dark surface markings hold strong contrast in red and near-infrared light, and it's the planet Astronomik singles out for its 742 nm filter. Saturn is dimmer, so a 742 nm filter can cost a meaningful amount of speed. Jupiter is bright, but an IR image is a different spectral view of its clouds rather than a neutral luminance channel for visible color.
If you combine IR with RGB, call the result IR-RGB or false color rather than presenting it as ordinary visible color. Capture the channels close together, because the planet rotates and the seeing changes, and a channel captured later can be structurally different from the earlier ones.
Can you use an IR-pass filter with a color camera?
A monochrome camera is the cleanest match, because every pixel contributes to the filtered band. A color camera can record near infrared if the sensor and everything in front of it transmit it, but the Bayer channels are no longer measuring ordinary red, green and blue. Treat the result as a single infrared intensity image, check that no UV/IR-cut filter is left in the light path (some color cameras build one into the sensor window), and compare exposure requirements before committing to a long sequence.
What does Saturn look like at 685 nm, 742 nm and in luminance?
Here's the comparison from my own setup. I captured all three clips in Laminar on October 8, 2026 (UTC), within 17 minutes of each other, on my Celestron EdgeHD 8 at its native f/10 (2,032 mm) with the same Player One Uranus-M at gain 300. That works out to 0.29 arcseconds per pixel. Saturn was only 25 to 29 degrees up from Houston, looking through more than twice the air it would overhead. The luminance frame went through the UV/IR-cut L filter from a Baader CMOS-optimized LRGB set, and the infrared frames through the Baader IR-Pass 685 and the Astronomik ProPlanet 742. I stacked the best 20 percent of each clip in Strata, the same share for all three to keep the comparison simple, then rotated and scaled the results so they share the same orientation and scale.
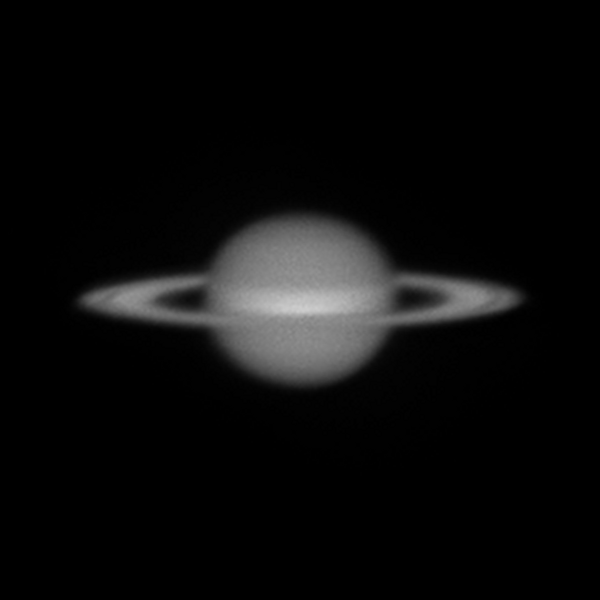
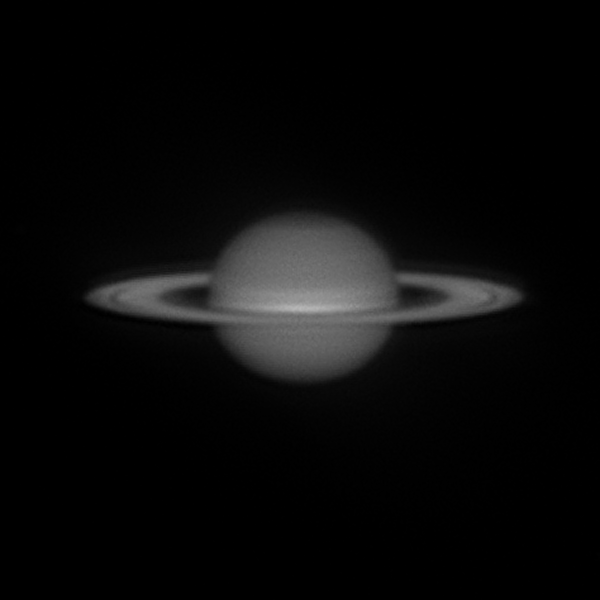
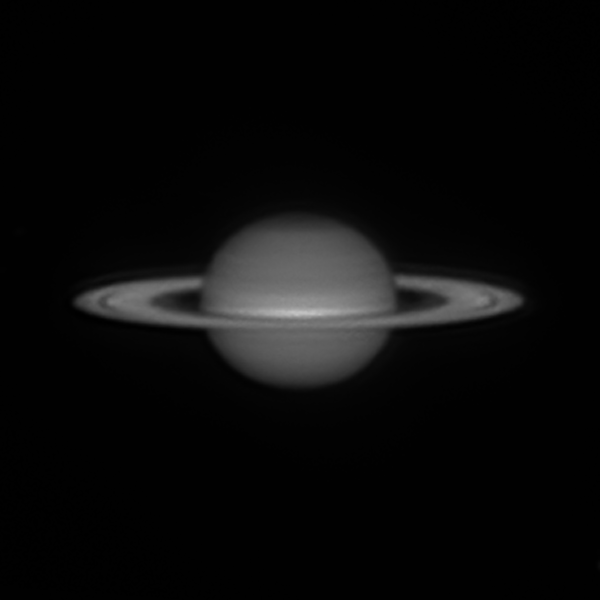
Saturn through a UV/IR-cut luminance filter (left), a Baader IR-Pass 685 (center) and an Astronomik ProPlanet 742 (right). Same Celestron EdgeHD 8 and Player One Uranus-M, all captured within 17 minutes of each other and shown at the same scale and orientation.
When you compare frames like these, look at three places: the Cassini Division where the rings are widest, the edge of the globe where the rings cross in front of it, and any banding on the globe. On this night the Astronomik ProPlanet 742 gave the crispest image of the three, with the clearest bands, the most detail in them and the cleanest Cassini Division. It also paid the light cost described earlier: at the same gain it needed 47.7 ms exposures against 30 ms through the 685, so the frame rate fell from 33 to 21 fps and the two-minute clip held 2,514 frames instead of 3,996. With Saturn that low, the steadier image was worth it.
Two caveats keep this from being a clean verdict. The 742 clip came last, about 15 minutes after the 685 clip, when Saturn had climbed about 3 degrees higher. And the luminance clip ended after 33 seconds instead of two minutes, so its stack drew on 305 frames against 799 for the 685 and 503 for the 742. One night on one telescope doesn't settle the question for anyone else's setup, which is why the test further down matters more than my frames.

How do you set up an IR filter comparison in Laminar?
Laminar, Mac Observatory's native planetary capture app for Apple Silicon Macs, handles the controlled part of this comparison. In its equipment profile, give each filter slot a label and set its kind to infrared pass. For an IR-pass filter, enter its cut-on; for a bandpass filter, its center and bandwidth. Watch for spec sheets that quote 400 to 700 nm, which describes ordinary visible light rather than an IR filter's passband. Laminar writes only what you enter and never guesses a wavelength from a filter's name. With camera settings memory turned on, it remembers exposure and gain for each filter and restores them when a sequence changes filters. Flats are kept per filter, and recordings stay raw unless you opt in to calibrated capture.
Focus is per filter too. Store an offset for each filter, either typed in or captured by refocusing and using the Update offset action, and with a motorized focuser connected and Auto-offset on filter change enabled, Laminar moves the focuser by the difference at each change. It drives USB wheels such as the ZWO EFW and Player One Phoenix, and it handles a manual wheel by asking you to confirm each position. Every clip gets a .laminar.json sidecar beside the SER file that records the filter's label, slot and the wavelength values you entered.
- Start with the 685 nm filter and a bright target high in the sky.
- Focus through that filter using Laminar's live focus tracking. Don't reuse a visible-light focus position without checking it.
- Choose an exposure short enough to keep a useful frame rate, then raise gain only as needed. Keep the brightest regions below clipping.
- Record a red or luminance clip for comparison within a few minutes, using the same ROI and a similar total duration.
- If you have a 742 nm filter, repeat the test. Judge the stack, not the preview.
How do you process IR captures in Strata?
Strata, Mac Observatory's planetary processing app for macOS, opens SER versions 2 and 3 at 8 or 16 bit from Laminar or any other capture app. Open a Laminar clip, or drop it in together with its sidecar, and Strata's Laminar Capture card shows the target, filter and wavelength recorded at the telescope. macOS only lets a sandboxed app read the file you open, so grant Strata your capture folder once in Settings, under Capture Folders, and it reads the sidecar from then on.
With a wavelength attached, Strata's Drizzle card compares your image scale with what the aperture can resolve at that wavelength and suggests a factor, and its From Equipment option sizes the deconvolution PSF from the aperture and wavelength. Strata doesn't guess a wavelength from a filter's name either, so fill it in on the Laminar side. The Laminar metadata is a bonus rather than a requirement: SER files from other capture apps process the same way.
The filter you set up at the telescope travels with every clip into processing.
Cut-on for IR-pass filters
Focus offset per filter
Exposure and gain remembered
Sidecar beside every clip
Filter, slot and wavelength recorded
Analyze and stack each clip
Drizzle and PSF advice by wavelength
Similar tonal contrast
Label IR-RGB as false color
Analyze each clip on its own. Strata's suggested keep percentage is a starting point, and an IR clip may have a different quality spread and frame count than its visible-light partner, so don't force every clip to the same number. Stack and sharpen conservatively, then compare results at the same output scale and similar tonal contrast. A darker or more heavily sharpened IR result can look "better" even when it holds no additional resolved detail.
How do you test 685 nm against 742 nm on your own telescope?
On one target, record three short clips through 685 nm and three through 742 nm, alternating filters so a slow change in seeing doesn't favor one side. A Laminar sequence can do the alternating for you, since each step selects its own filter. Keep ROI, duration and approximate histogram placement consistent, and focus each filter. In processing, note the exposure, frame rate, frames kept and final scale for every clip.
Strata's Batch Analysis ranks a night's captures in one comparison table, which is a quick way to pick the best of the three 685 nm clips and the best of the three 742 nm clips. Use it within each filter rather than across them, since a frame-quality score measured at one wavelength isn't a fair yardstick at another. Then compare the two winning stacks by eye. If 742 nm repeatedly shows more stable fine structure after equivalent processing, it's earning its lower throughput. If the 685 nm stack resolves at least as much while supplying more frames, use the lighter filter.
That result belongs to that telescope, camera, target altitude and night. Repeat it when the seeing changes. IR-pass imaging won't give you one permanent winner, but it does give you another controlled option for the nights when visible light is leaving detail on the table.
These are the questions that come up most when people first try an IR-pass filter.
Common questions about IR-pass filters for planetary and lunar imaging.
Is a 685nm or 742nm IR pass filter better for planets?
Do I need a mono camera to use an IR pass filter?
Is an IR pass filter worth it on a small telescope?
Does an IR pass filter work on Saturn?
Do I need to refocus when I switch to an IR pass filter?
Can I use an IR image as luminance for a color planet image?
Does an IR pass filter replace an ADC?
Where should you go from here?
Start with a 685 nm filter on the Moon or Mars on a night when visible light looks soft, run the alternating test, and add a 742 nm filter only if the 685 nm stacks stop improving on rough nights. Record the filter with every clip so your comparisons stay honest months later.