Laminar 1.5 adds live calibration to Mac planetary and solar capture: dark frame subtraction, flat frame correction, and hot pixel correction applied to the live preview as you focus and tune, not just baked into files after the session. Laminar is the native macOS, Apple Silicon planetary and solar capture app I build at Mac Observatory, and 1.5 is the biggest single feature I have shipped since launch. As far as I know it is the first Mac capture app that corrects the live view in real time, so you can hunt focus and find the solar sweet spot against a clean image instead of a dusty, gradient-streaked one.
This is the calibration release. Everything below is in 1.5, which is on the Mac App Store (or in review as you read this). I built and shot all of it on a PlayerOne Uranus-C PRO under a waning crescent Moon from my backyard in Pearland, just south of Houston.
Why calibration usually waits until after capture
In a normal planetary or solar workflow, calibration is a post-processing step. You capture thousands of raw frames as SER video, then your stacker applies darks and flats while it sorts and aligns. That works, and it is still where most of the heavy lifting belongs. But it means the image you are actually looking at while you focus, frame, and tune your etalon is the uncorrected one, with every dust mote, hot pixel, and illumination gradient still in the way.
A quick vocabulary check, since these three frame types do different jobs. A dark frame is an exposure taken with the scope capped, so it records only the sensor's own thermal signal and hot pixels, which then get subtracted from your light frames. A flat frame is an exposure of an evenly lit surface that records the optical system's shadows and vignetting, so they can be divided out. A hot pixel map is the list of stuck-bright pixels derived from a dark, used to patch those pixels individually. Laminar 1.5 can apply all three to the live view, the recorded file, or both.
Calibration has its own home in Settings
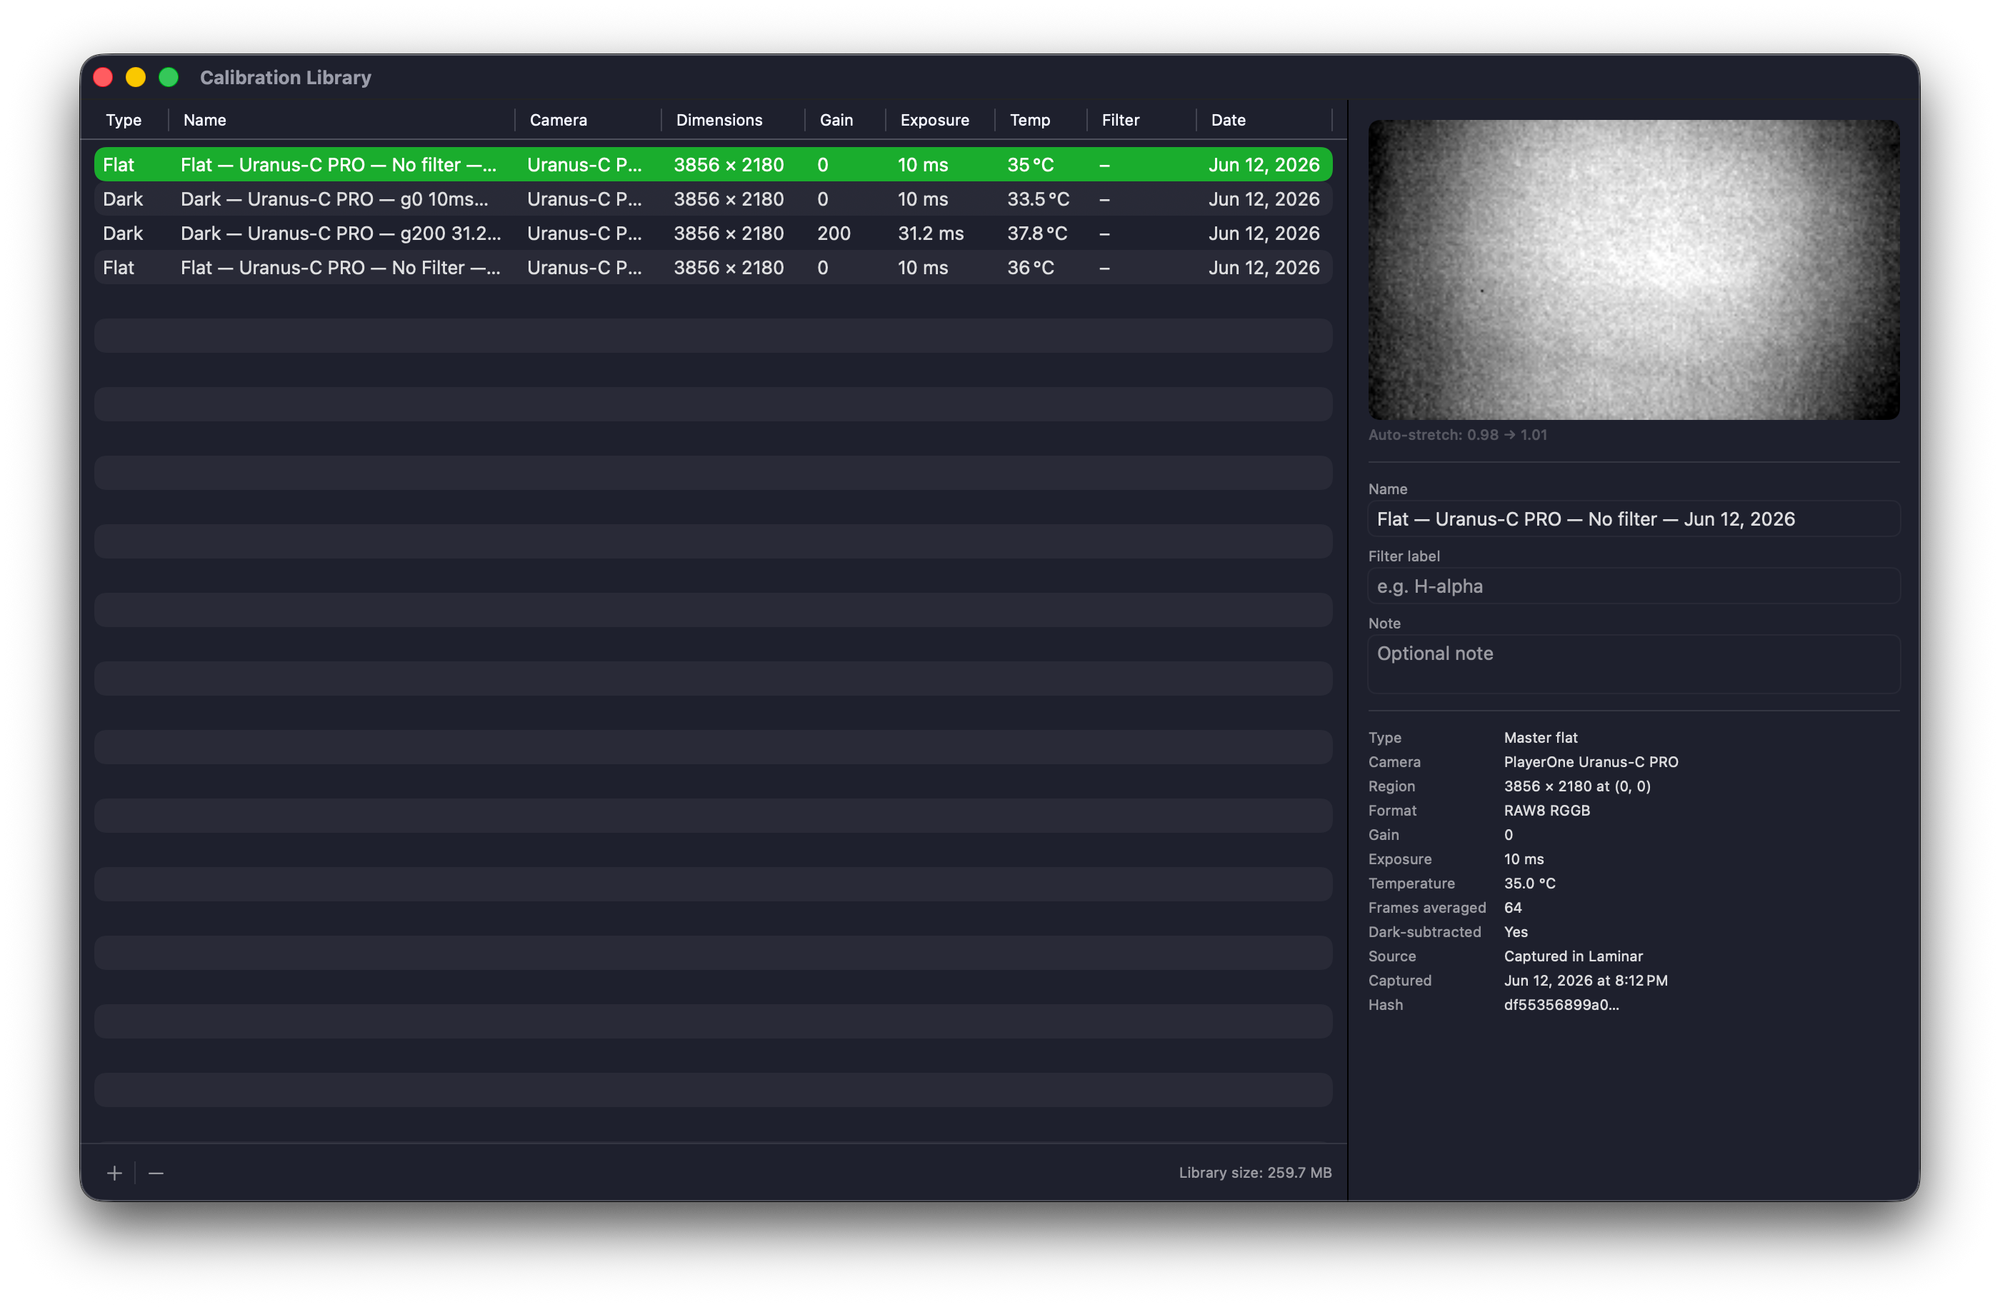
Rather than bury this in a menu, I gave calibration its own tab in Settings, next to Capture, Weather, and Diagnostics. Each of the three corrections is a single toggle with a live match status underneath it, telling you exactly which master is applied and how old it is, for example "Matched: Dark, Uranus-C PRO, g200 31.2ms 37.8°C, Jun 12, 2026, captured today." If no compatible master exists for the connected camera, the toggle simply does nothing rather than guessing.
Underneath that is the part I think matters most: an Apply To section with independent toggles for the live preview and for recorded files. You can correct the preview for focusing and tuning while still writing byte-faithful raw to disk, or you can bake the corrections into the recording too. That split is deliberate, and it is the heart of the speed tradeoff I will get to shortly.
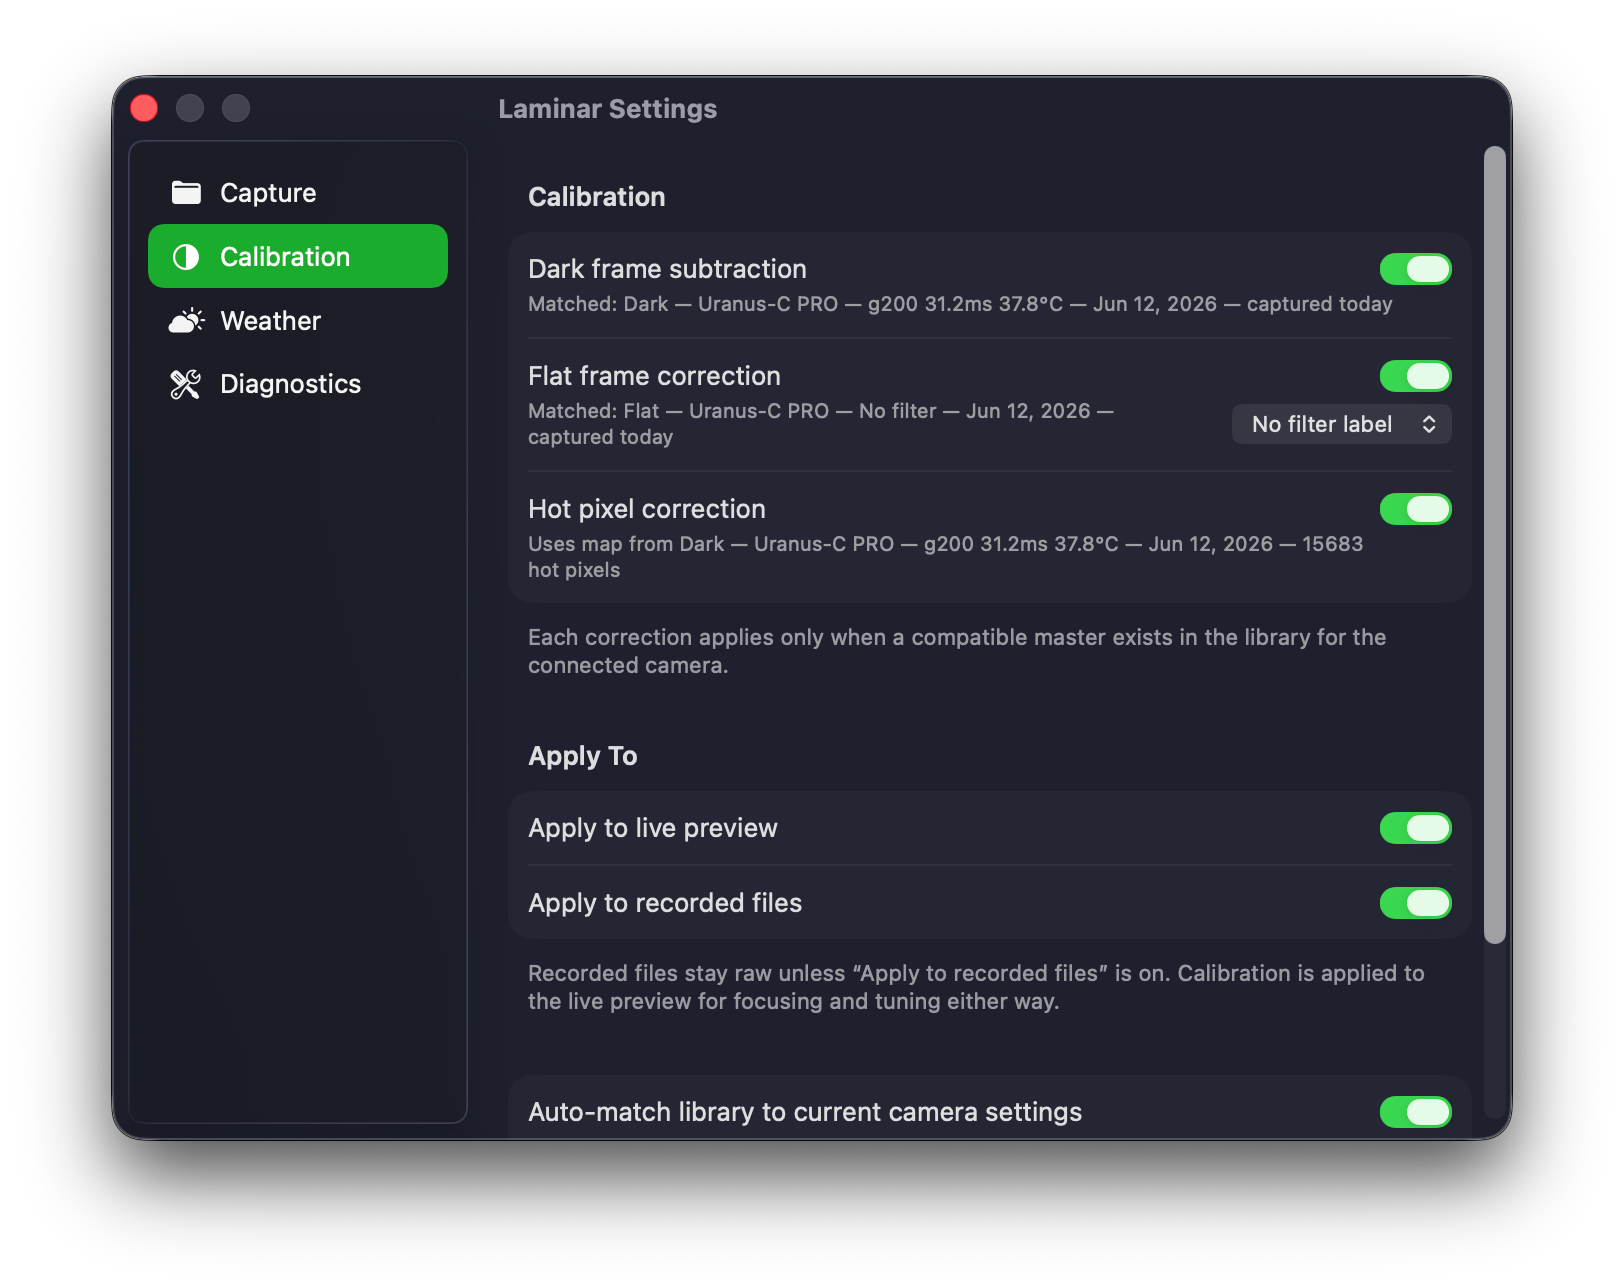
Each correction applies only when a compatible master exists in the library for the connected camera. Auto-match handles the selection, so connecting a different camera quietly swaps in that camera's masters, or none.
Building masters without leaving the app
You do not need a second piece of software to make your calibration frames. Laminar 1.5 has guided capture wizards for both darks and flats, each in three steps: prepare, acquire, and review.
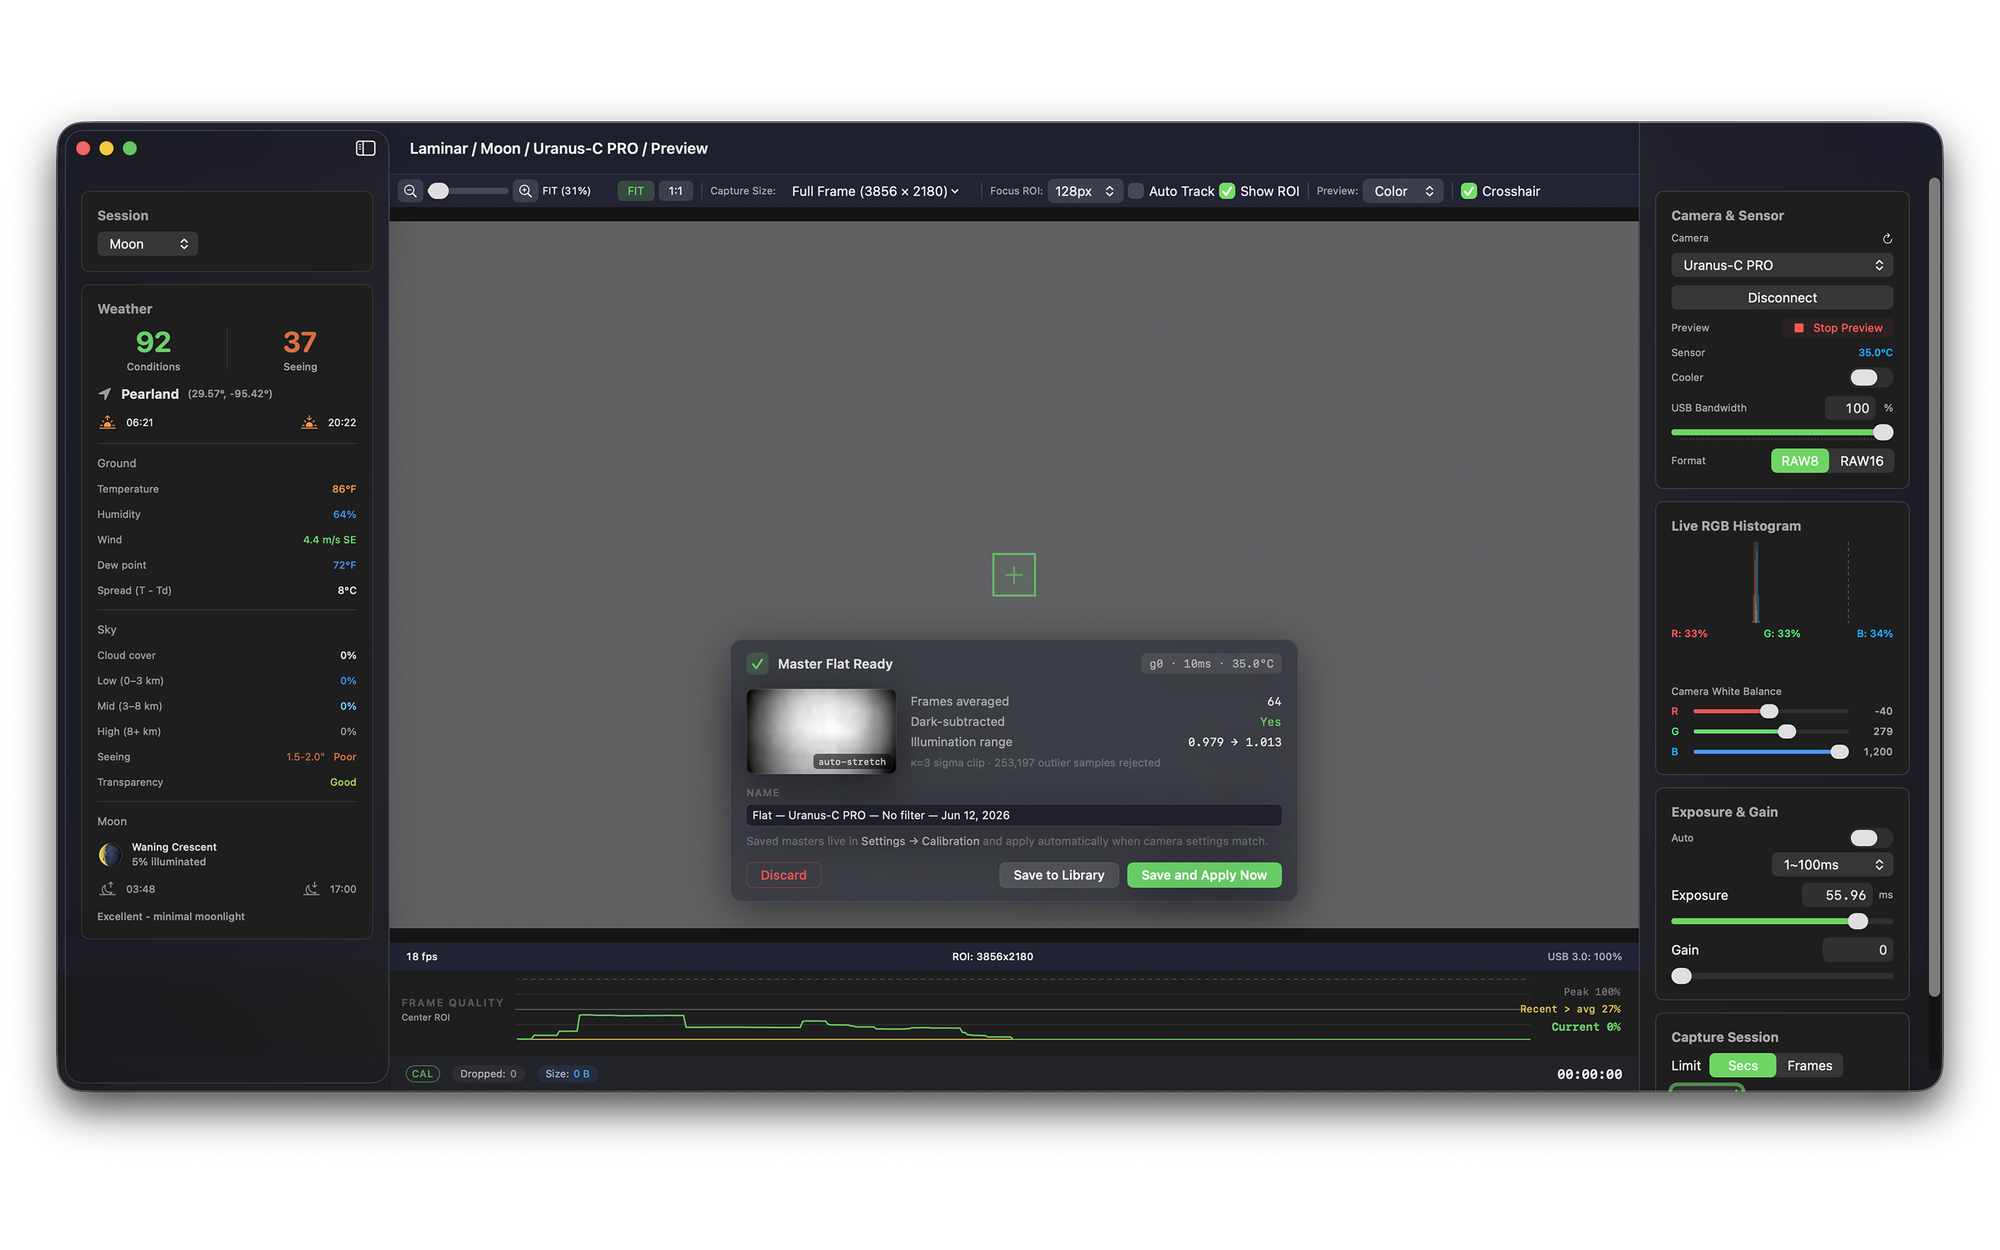
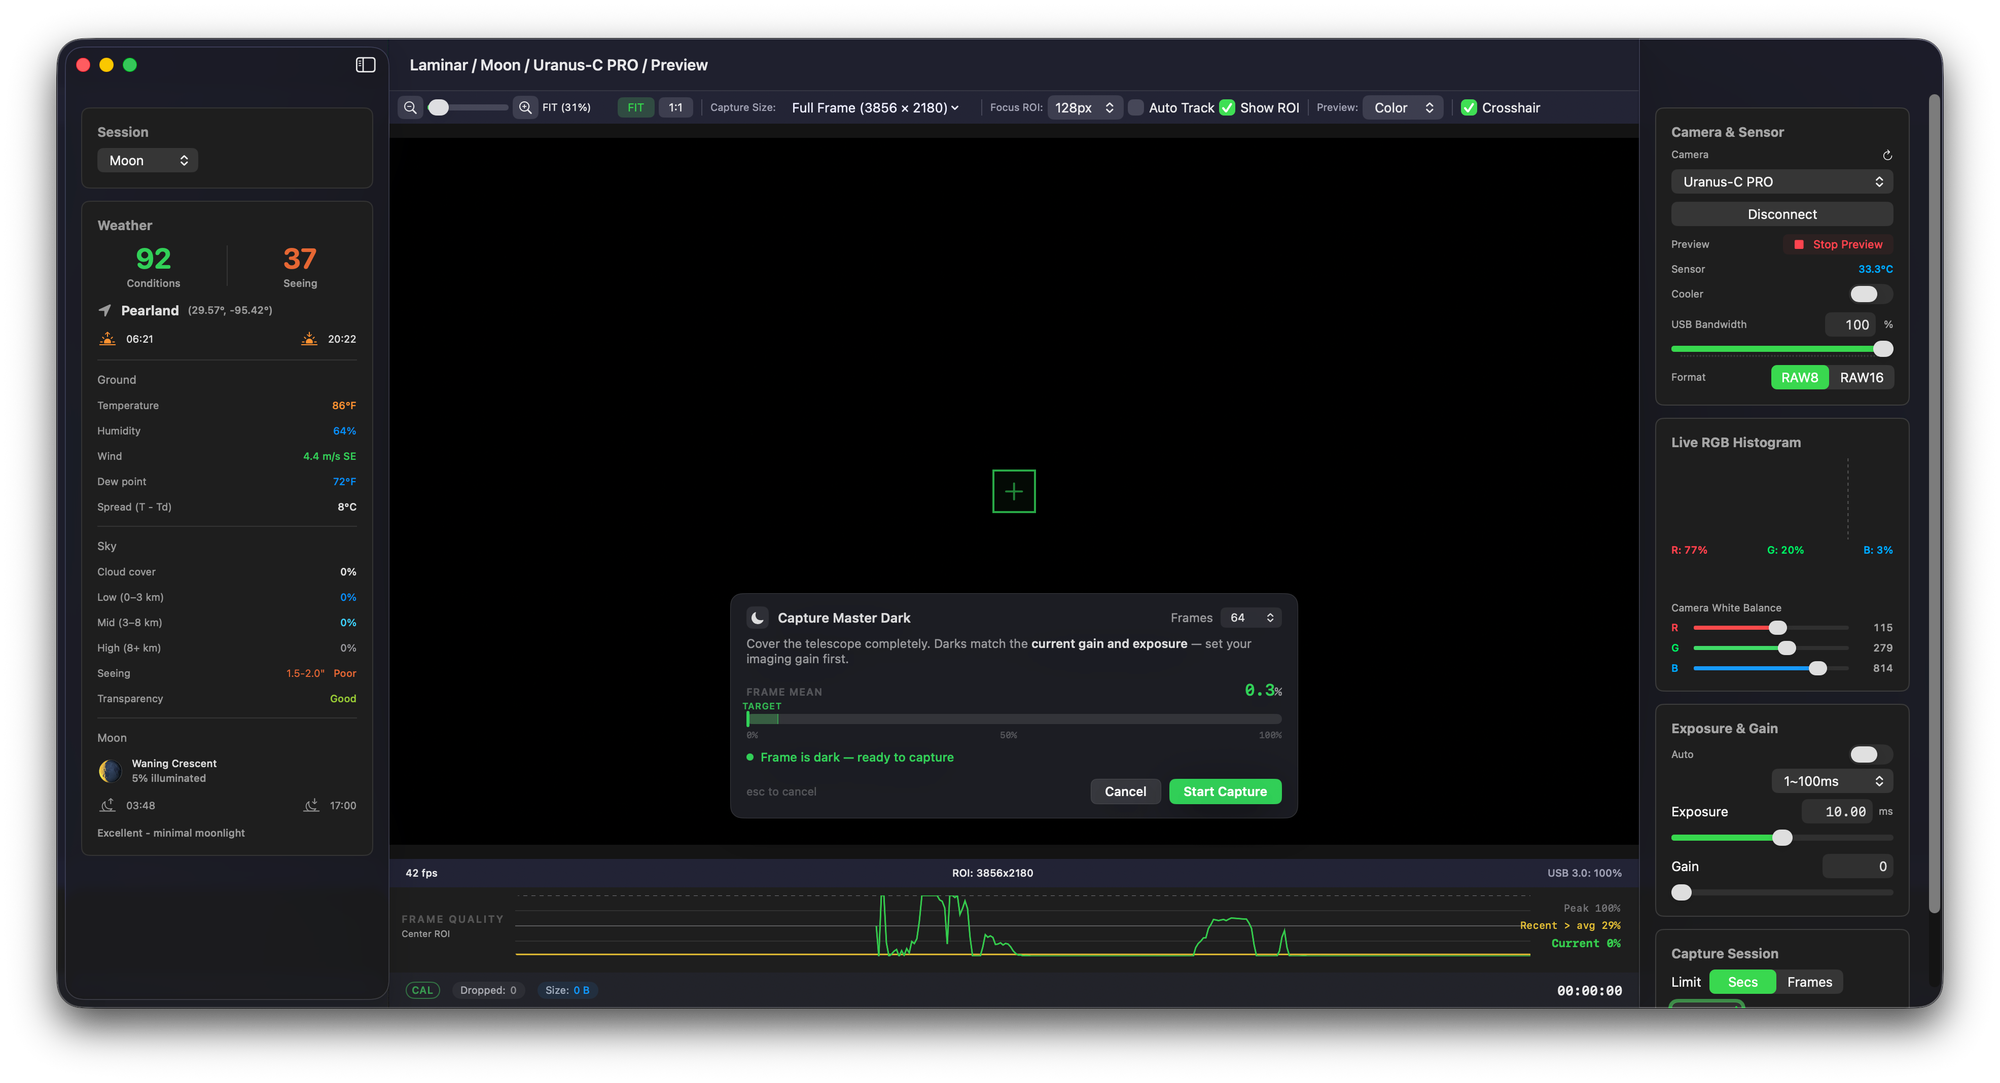
The Capture Master Dark wizard asks you to cap the scope, then watches the frame mean and tells you plainly when the frame is dark enough: "Frame is dark, ready to capture." Darks match your current gain and exposure, so the wizard reminds you to set your imaging gain first. The Capture Master Flat wizard wants an evenly lit surface, a twilight sky, a flat panel, or the classic white t-shirt stretched over the aperture, and it shows a target zone for the frame mean so you land in the 40 to 80 percent range instead of guessing. Flats can be dark-subtracted automatically during the stack, and you can tag them with a filter label like H-alpha.
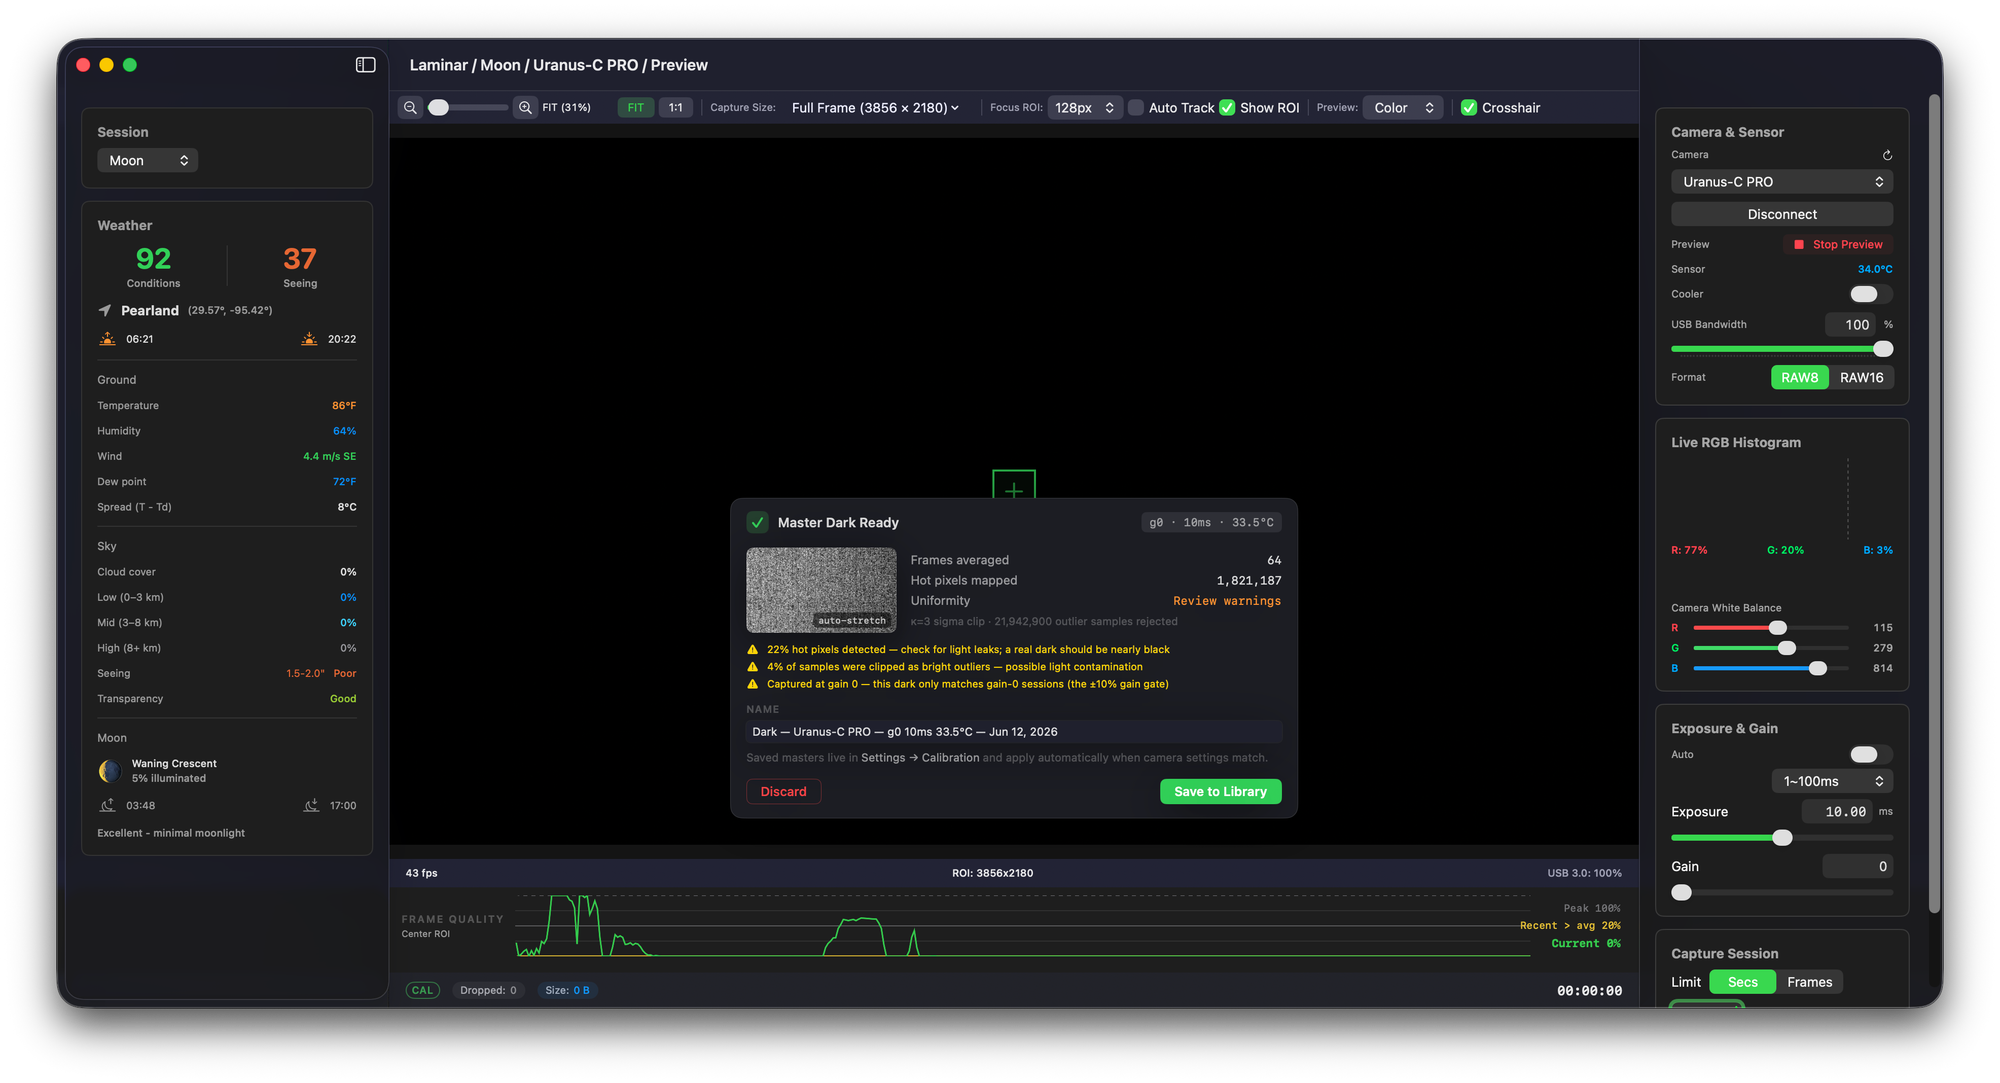
Both wizards stack with sigma clipping at 64 frames or more, then hand you a review card before anything is saved. This is where my UI background shows: the review card does not just say "done," it tells you what it found. A master dark review reports frames averaged, hot pixels mapped, and a uniformity check, and it will throw real warnings, "22% hot pixels detected, check for light leaks; a real dark should be nearly black," or "captured at gain 0, this dark only matches gain-0 sessions." I would rather the app tell you a master looks wrong before you trust it for a whole night than have you discover it in the stack the next morning.


Real-sun flats, applied live
This is the feature I most want the solar crowd to push on, because it is the one that changes how a session feels. Capture a master flat against the actual Sun, a defocused disk or a diffuser, get the histogram peak into the target band, and hit Save and Apply Now. The flat is correcting your live view in a single step. Now when you tune your etalon and hunt the sweet spot, Newton's rings, dust shadows, and the etalon gradient are knocked down in real time, so you are reacting to actual surface detail instead of fighting your own optics.
That live-correction loop is the difference between calibration as a chore you do for the stacker and calibration as a focusing aid you use in the moment. For solar especially, where the sweet spot moves as the etalon warms, seeing the corrected disk live is genuinely useful rather than just tidy.

The calibration library, and bringing in masters you already have
Every master you keep lands in a per-camera Calibration Library, a proper window with type, name, camera, dimensions, gain, exposure, temperature, filter, and date, plus an auto-stretched preview and the full provenance of each frame down to a content hash. Auto-match uses gain as the gate, with exposure and temperature as scoring preferences, which is the correct call for planetary and solar work: at millisecond exposures thermal dark current is negligible, so matching gain matters far more than matching temperature to the degree.
You are not locked into masters you shoot in Laminar, either. You can import existing ones, FITS (8 and 16-bit integer plus 32-bit float), 16-bit TIFF and PNG, and SER stacks in mono, every Bayer layout, and RGB or BGR. So if you are coming from FireCapture, the free capture app a lot of planetary and solar imagers cut their teeth on, you can bring your existing masters straight in and compare them against ones captured in Laminar. Files it cannot parse are rejected with a specific reason rather than failing silently.
The honest tradeoff: live correction versus fastest capture
Real-time dark and flat correction is not free. Running both on the pipeline costs roughly 3 to 5 fps. On a fast planetary camera pushing high frame rates that is a real cost, and I am not going to pretend otherwise. The good news is that the Apply To split means you decide where to spend it.
If you want the cleanest possible live view for focusing and solar tuning, turn correction on for the preview and accept the slightly lower preview rate. If you want absolute maximum frame rate to disk, the better move is often to leave "Apply to recorded files" off, record byte-faithful raw at full speed, and apply your darks and flats afterward in your stacker, AutoStakkert or Siril on the Mac. Every calibrated recording also drops a small .laminar.json sidecar documenting exactly which masters were applied, so your records stay honest either way. Hot pixel correction is the cheap one, so a common middle ground is hot-pixel-only on the recording with full correction on the preview.
Leave "Apply to recorded files" off, record raw at full speed, and calibrate in post. You keep the fps, you keep the original data, and the sidecar still records what would have been applied. Live correction is there for your eyes during focus and tuning, not as a tax on every recording.
Planetary versus solar: what is actually worth calibrating
The two disciplines pull on different corrections, and it is worth being clear about which is doing the work. For planetary imaging at sub-millisecond to single-digit-millisecond exposures, dark subtraction is not the headline, because there is almost no thermal dark current to subtract in that time. What helps is hot pixel removal and amp glow suppression, so shoot darks at your usual gains and run hot-pixel-only correction on a live session and see what cleans up.
Solar is the opposite story. Flats are where the win is, because the etalon gradient, Newton's rings, and dust shadows dominate the frame far more than sensor noise does. That is exactly why the real-sun flat workflow above is aimed squarely at the solar imagers in the beta group, whose feedback gated this release. If you image both, the per-camera library keeps your darks and flats sorted so the right ones load automatically when you switch targets.
A few common questions about how this fits an existing workflow are answered in the FAQ below.
Common questions about Laminar 1.5 calibration from the Mac planetary and solar imaging community.
Do I still need AutoStakkert or Siril if Laminar does calibration?+
Will live dark and flat correction slow down my capture?+
Can I import my existing FireCapture darks and flats?+
Do I even need darks for planetary imaging at short exposures?+
How do I shoot flats for solar or H-alpha?+
Does calibration change my recorded SER files?+
Is calibration a paid add-on or included with Laminar?+
If you image the Sun, Moon, or planets on a Mac, the calibration release is the one I would most like your eyes on. Pull a master dark and flat for your camera, turn on live correction, and tell me whether the corrected view earns its place in your routine, here in the comments, on Cloudy Nights, or through the app's support page.