
Laminar 1.2.3 is now in App Store review and will be live on the Mac App Store shortly. This release wraps up the editable Custom Region of Interest workflow that started in 1.2.0, replaces the live preview path with a Metal-direct architecture that no longer competes with the recording pipeline for time on the main thread, and graduates two cameras — the SVBONY SV305C PRO and the ToupTek Astro G3M678C — out of Beta after I tested them end-to-end on my own bench.
Laminar is the native macOS planetary capture app I've been building as part of the Mac Observatory Suite. This is the third feature update in the 1.2.x cycle, and it bundles every fix and improvement that landed in 1.2.1 and 1.2.2 into the single App Store release.

The Custom ROI Workflow Is Finished
The headline change in 1.2.3 is the one most users will notice first. The drag-on-preview Custom ROI that shipped in 1.2.0 is now fully editable, with eight resize handles, drag-to-move semantics, and a numeric X / Y / W / H action bar at the bottom of the preview.
Here's the full workflow. Pick Custom… at the bottom of the Capture Size dropdown and the camera switches to full sensor view. A prompt appears across the preview: "Click and drag on the preview to define your custom capture region."
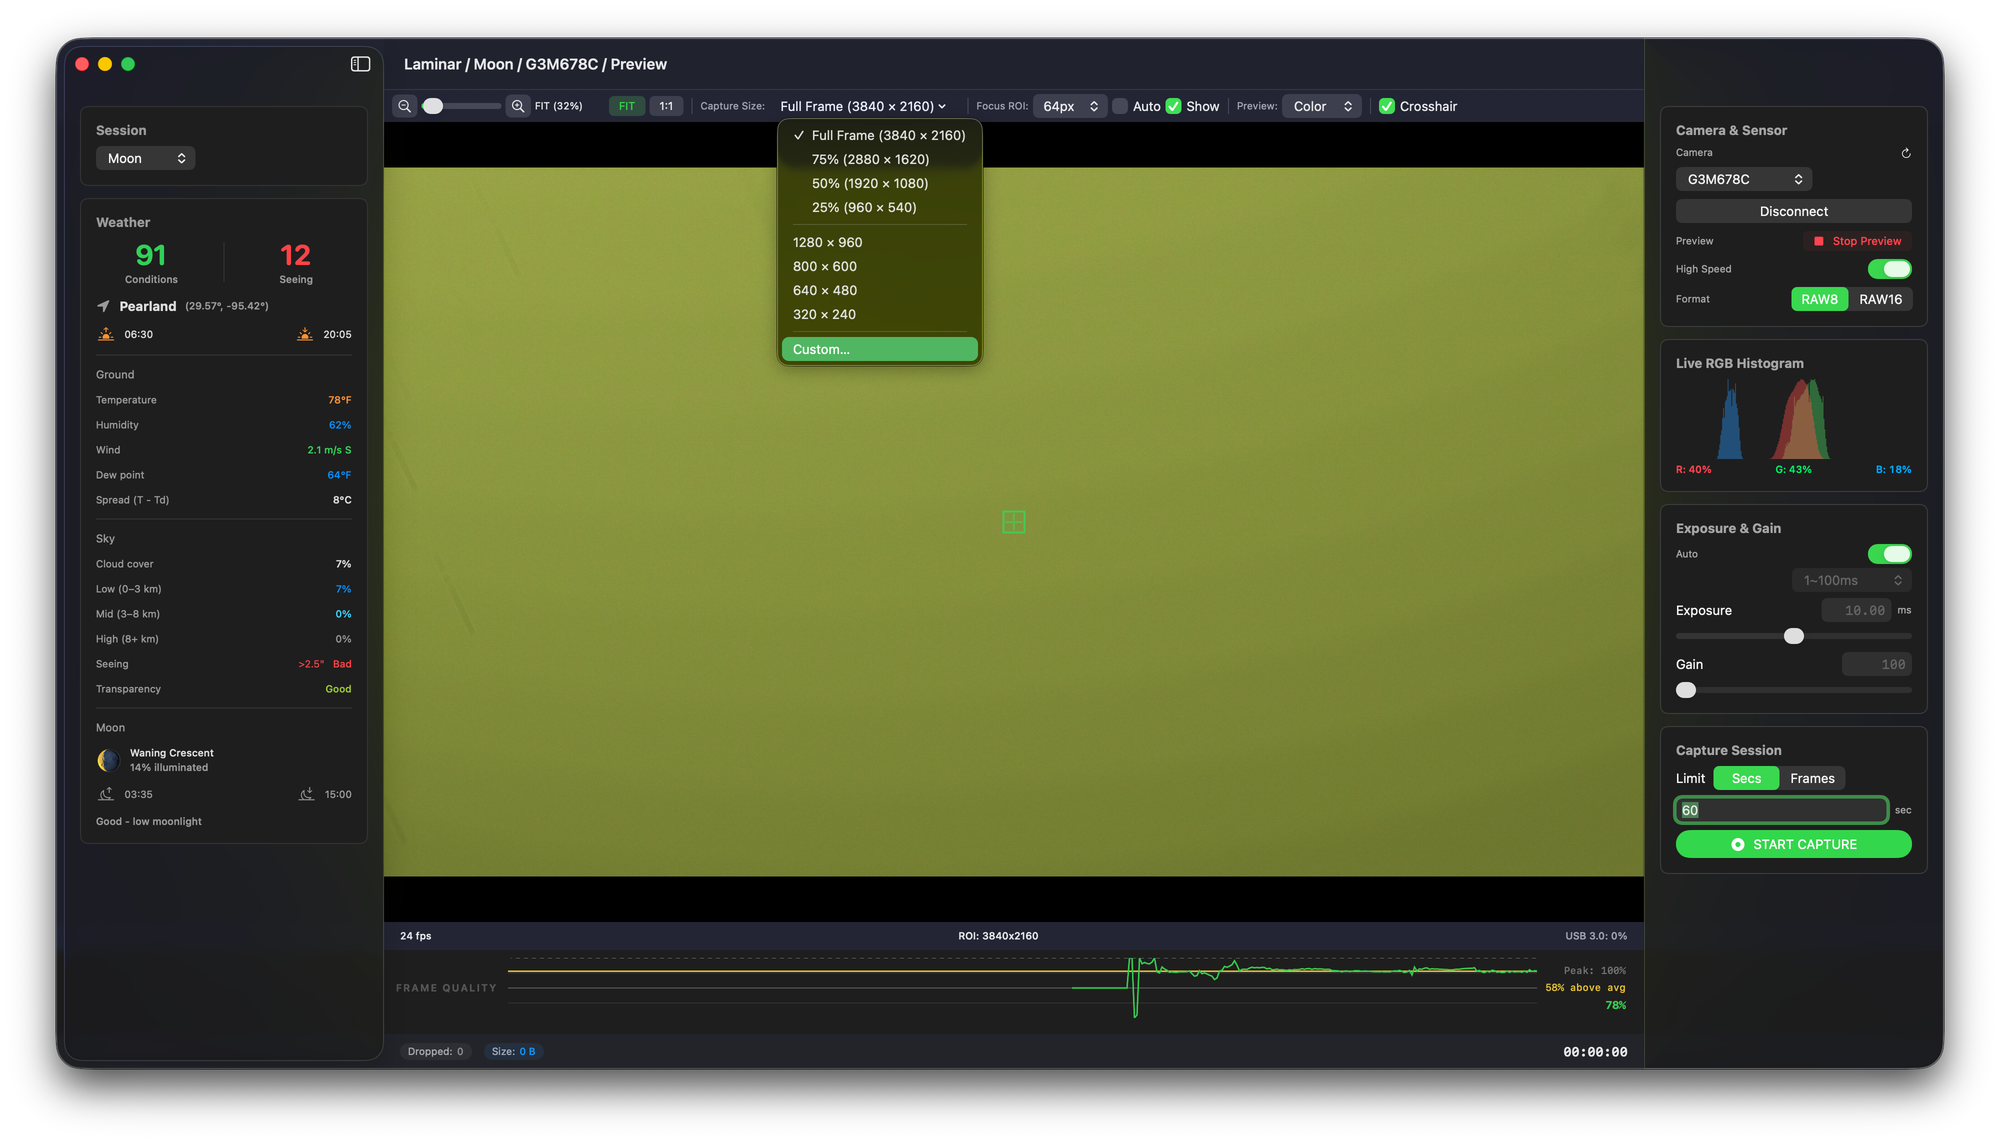
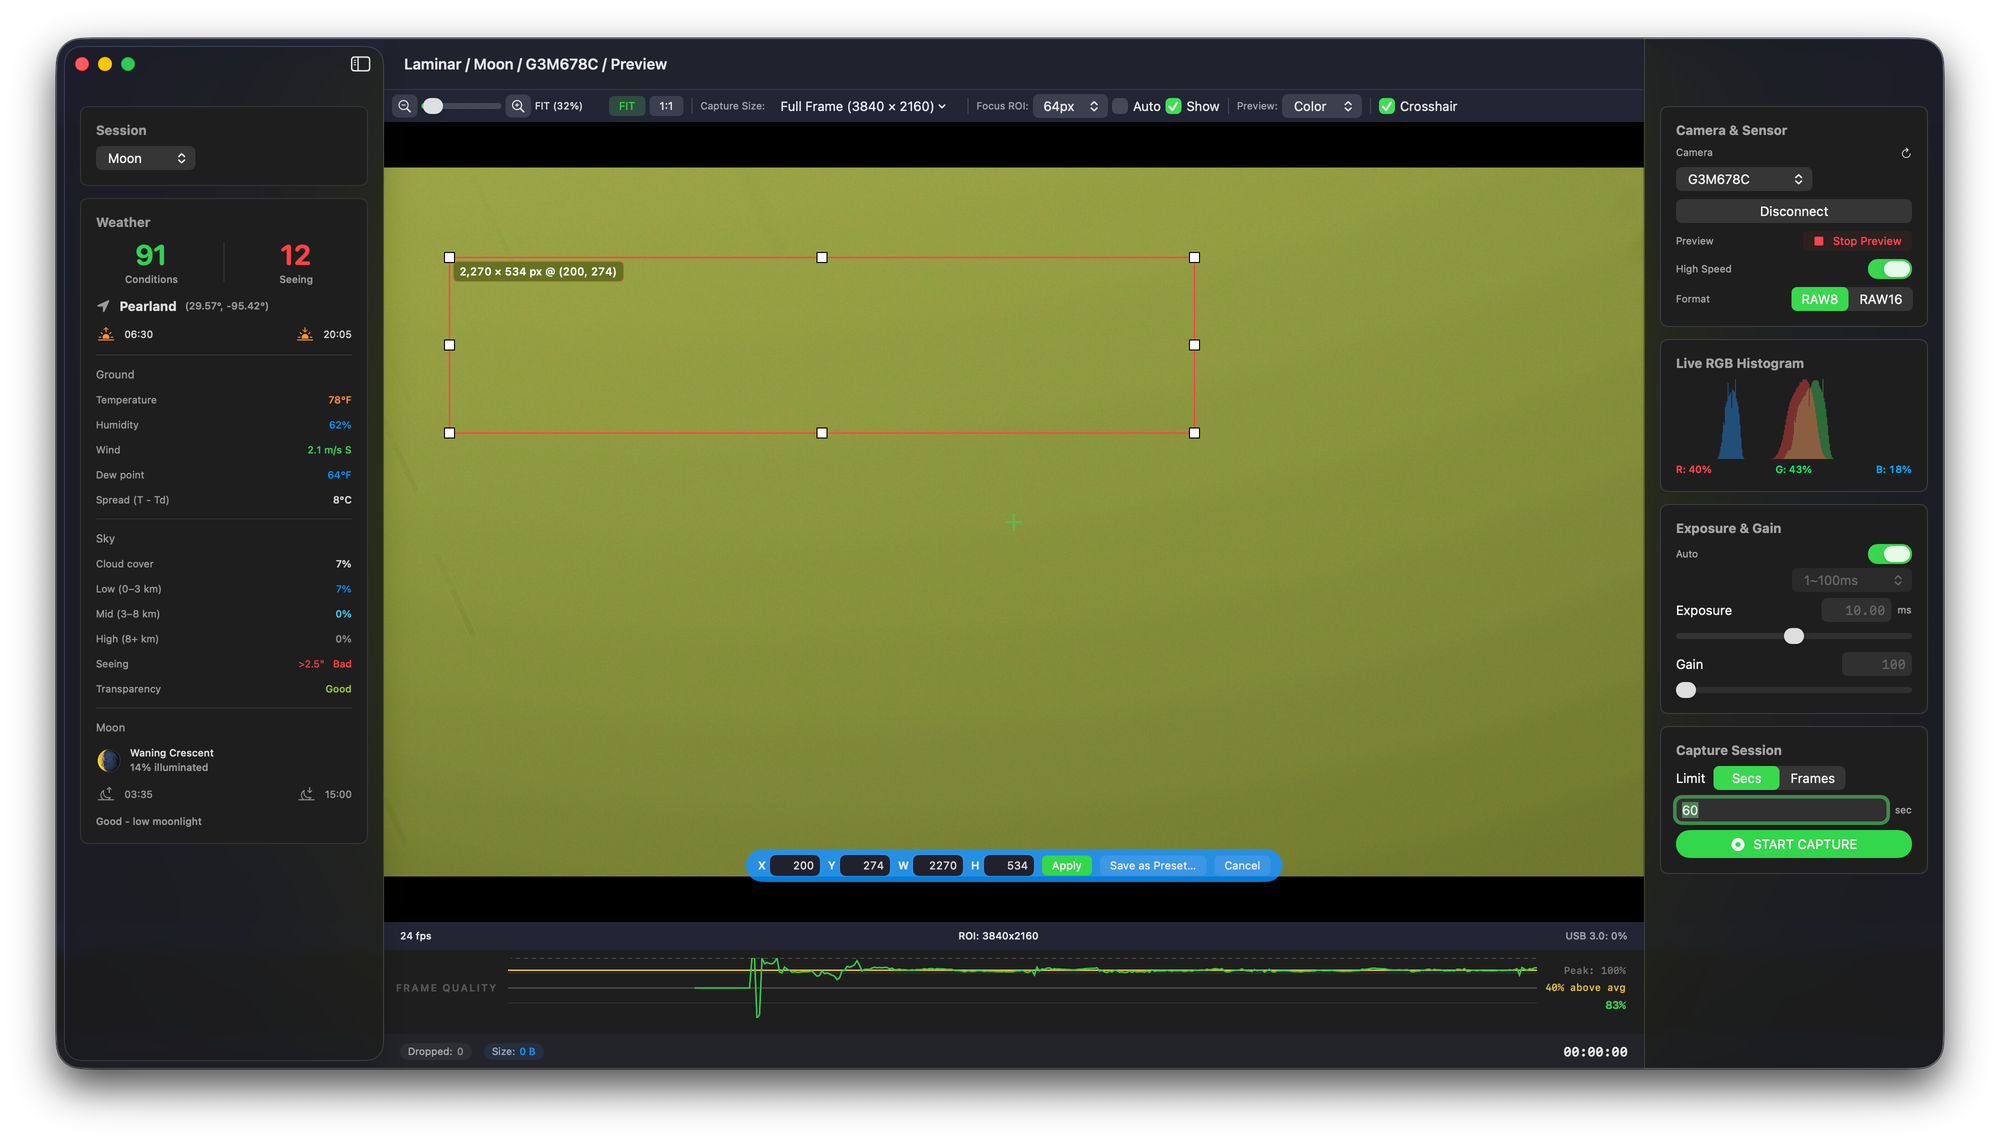
Drag anywhere on the preview to draw a rectangle. A live badge follows the cursor showing snapped sensor dimensions and coordinates, like 3,826 × 50 px @ (0, 274). Release the mouse and the rectangle stays put as an editable draft. From there, you have three ways to refine it:
- Drag inside the rectangle to slide it across the sensor. Width and height stay fixed.
- Drag any of the eight handles to resize. Corners move two adjacent sides. Edges move a single side.
- Type into the X / Y / W / H fields in the action bar.
Every value is snapped to the camera's actual pixel alignment, so what's shown on screen is what the camera will capture. Nothing touches the SDK until you click Apply — drawing, moving, resizing, and typing are all local edits, so you can iterate freely without restarting the preview.
This workflow was driven by feedback from JB, a French spectroheliograph (SHG) imager who tested 1.2.0 via TestFlight. SHG users think of the ROI as a movable sensor window they're positioning over a spectral feature, not as a crop form they have to redraw every time the line drifts. Building the editable draft around that mental model is what made it click for him.
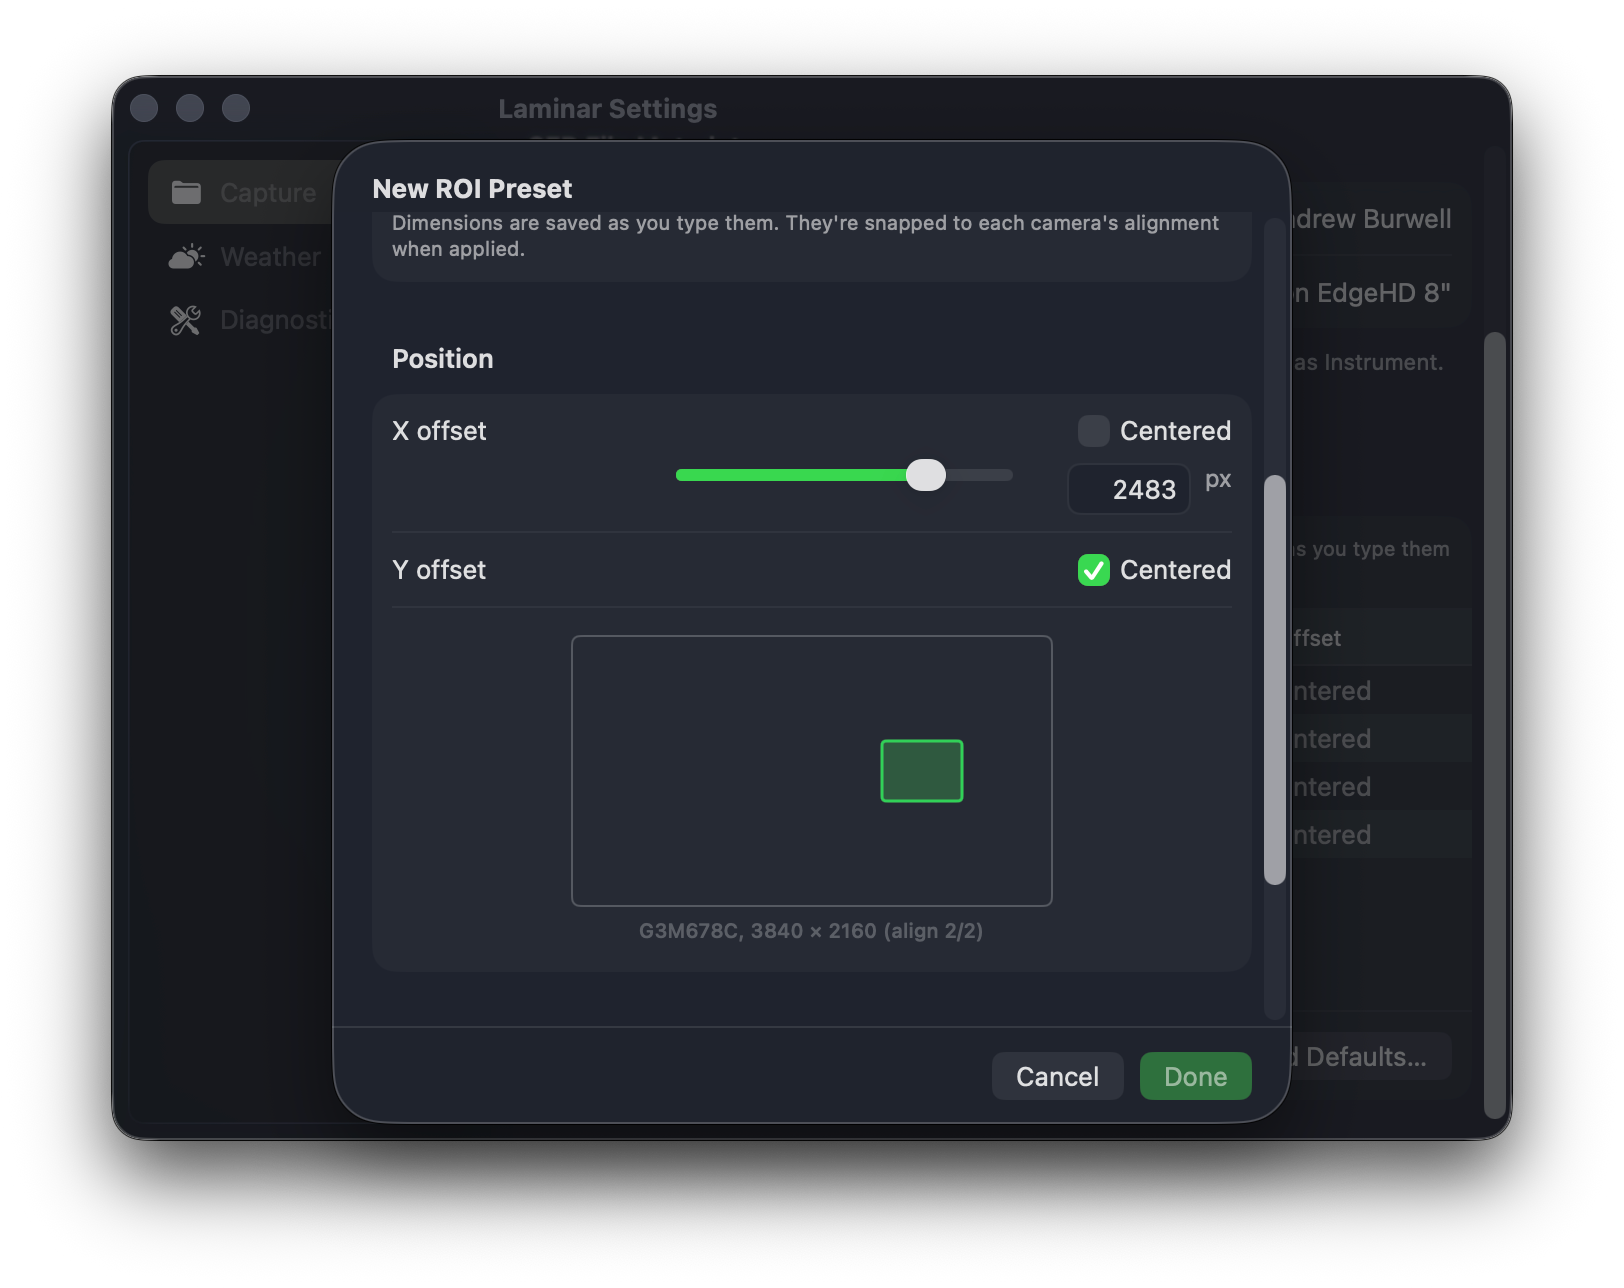
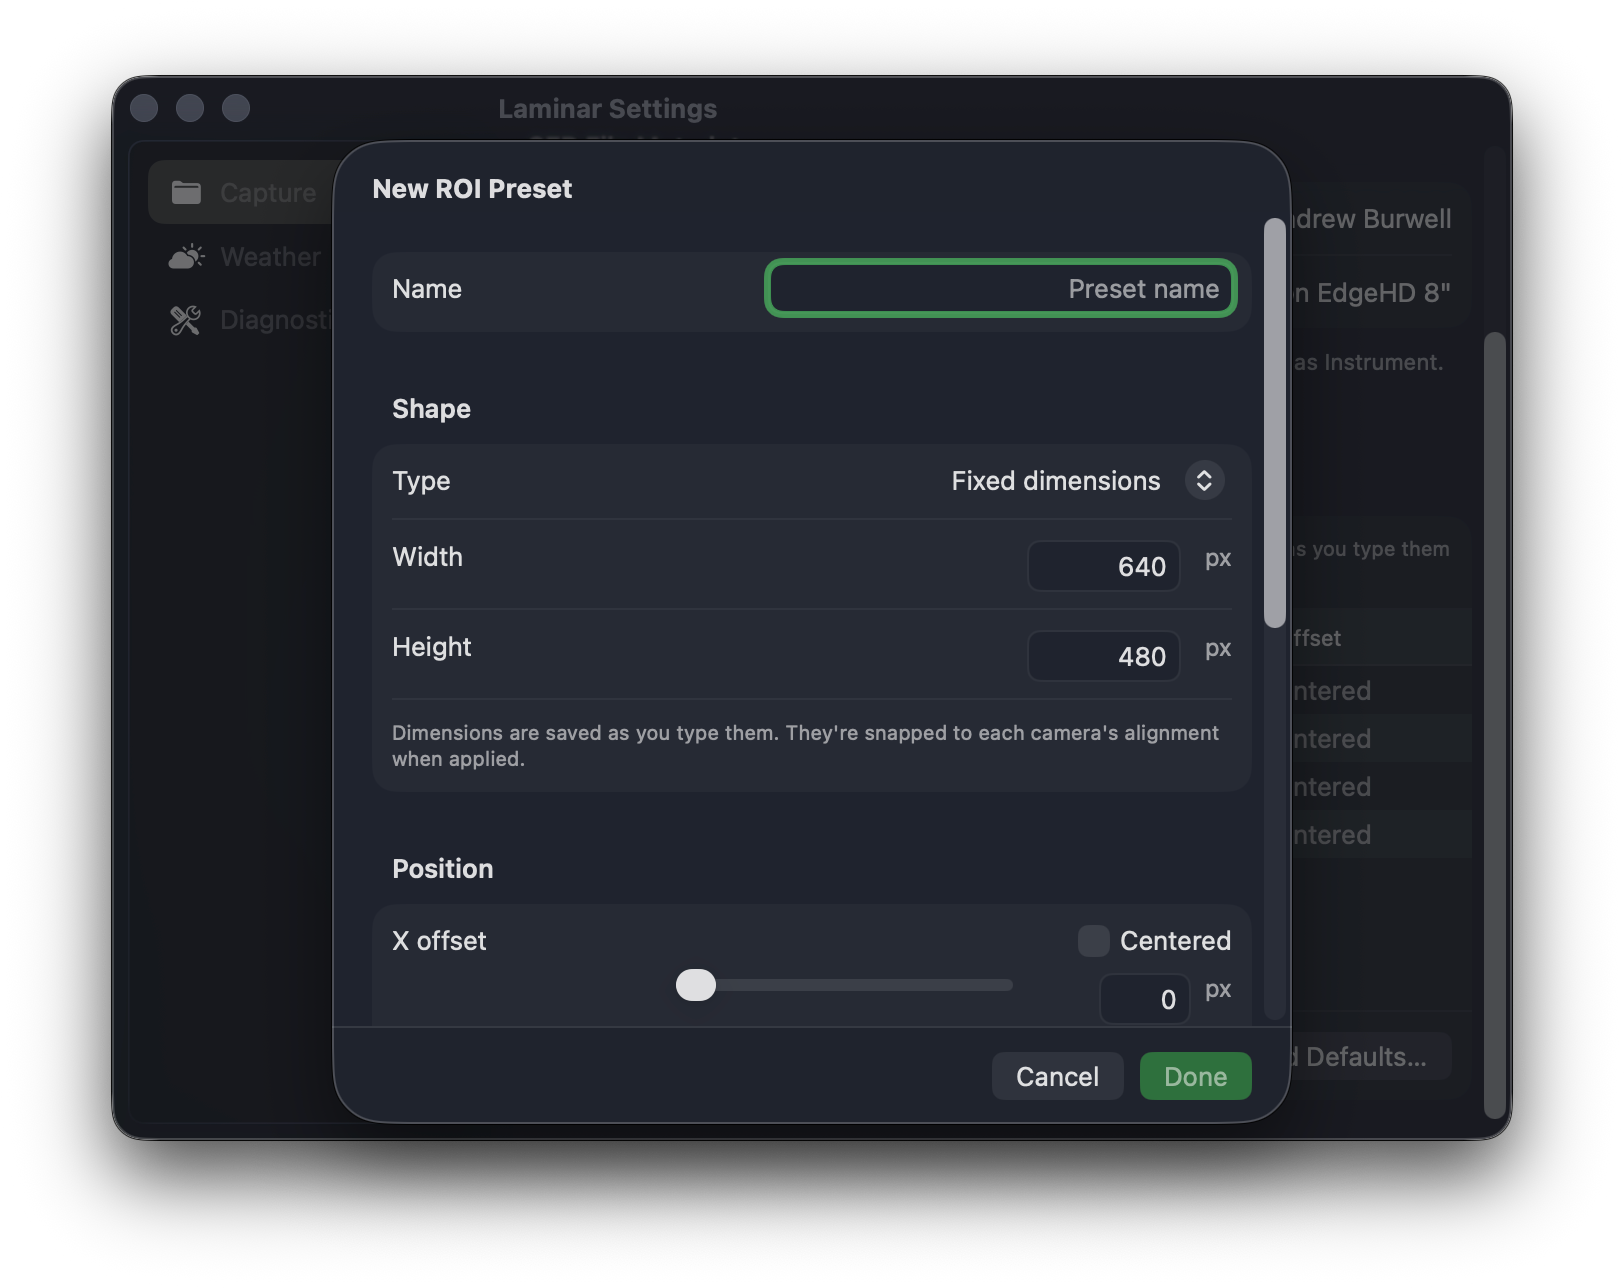
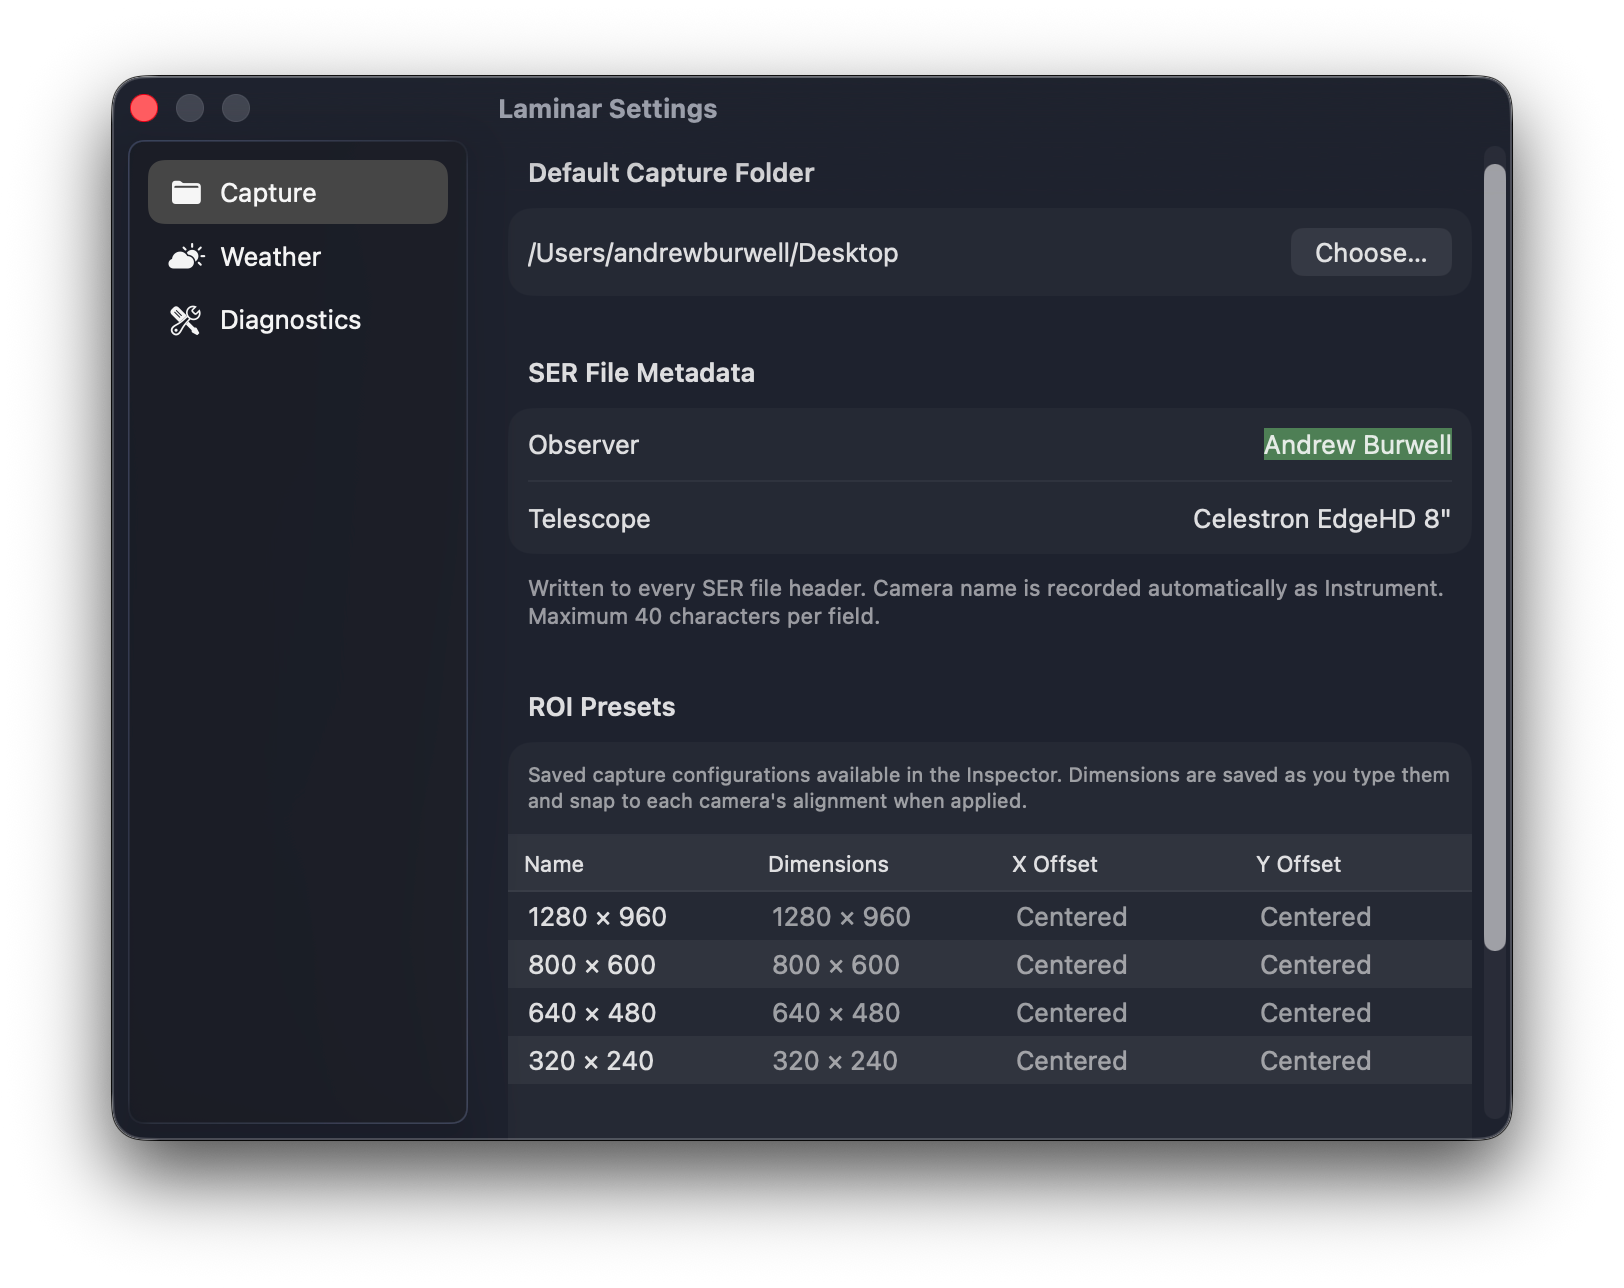
The other half of the ROI work is the managed preset library. Settings → Capture has a list of saved capture configurations that ships with the four planetary sizes (1280×960, 800×600, 640×480, 320×240). You can add, rename, edit, and delete presets, and the editor shows a scaled sensor outline with a green ROI rectangle that updates as you change dimensions and offsets.
Spectroheliography is a solar imaging technique that captures the Sun in a single, narrow wavelength of light — typically a specific absorption line such as H-alpha or Calcium-K. A spectroheliograph (often a Sol'Ex) uses a diffraction grating to spread the Sun's spectrum across the camera sensor, then scans the solar disk to build a monochromatic image showing features only visible at that wavelength: prominences, filaments, sunspots, granulation, and surface activity invisible in white-light imaging.
Why ROI matters for SHG: The image actually recorded is a narrow strip — usually tens of pixels tall by the full sensor width — that intersects the absorption line. Wider strips waste bandwidth and reduce frame rate. Narrower strips push the camera to four-digit frame rates on a typical planetary sensor and let you capture the same scan faster, with more frames available to stack from.
The Laminar workflow: Pick Custom… at the bottom of the Capture Size dropdown to enter full-frame framing mode. Draw a rough strip across the target line on the full-sensor preview, then use drag-to-move and the resize handles to position the strip exactly on the line. Type final pixel values into the action bar for last-micron precision. Click Apply when it's right. If the strip works, click Save as Preset and name it after the line ("H-alpha 80px") so the next session is one dropdown click away.
Under the Hood: A Refactored Imaging Pipeline
The visible Custom ROI work would be useless if the underlying capture pipeline couldn't keep up. So underneath, 1.2.2 and 1.2.3 contained two architectural changes that I think matter more than anything else in this release.
Live preview goes Metal-direct. Frames now flow from the camera into a triple-buffered Metal compute texture, then straight to an MTKView for display. There's no intermediate CGImage step on the per-frame display hot path anymore. Display rate is paced by the active screen refresh, and the preview no longer competes with the SER recording pipeline for time on the main thread. On large sensors during heavy recording, the difference is obvious — Donald, who tested with a 3840×2160 RAW16 sensor that pushes about 380 MB/s through the pipeline, was hitting main-actor saturation in earlier builds whenever he opened a dropdown menu. That class of UI freeze is gone.
Camera-agnostic frame envelope. All five SDK backends — ZWO, PlayerOne, QHY, SVBONY, and ToupTek — now deliver each frame as a RawCameraFrame envelope through a shared validation gate. Buffer size and descriptor are validated before the SER writer touches them. Every frame is either written or rejected with a logged reason. No silent loss. ZWO and PlayerOne behavior is byte-identical to before. The ToupTek family (including the Omegon, OGMA, RisingCam, MallinCam, and Altair Astro OEM rebadges), QHY, and SVBONY paths now get the same correctness guarantees ZWO and PlayerOne already had.
That same shared pipeline is what makes the Metal GPU debayer preview path available to SVBONY, ToupTek, and QHY color cameras now, not just ZWO and PlayerOne.
Two Cameras Graduate From Beta
The SVBONY SV305C PRO and the ToupTek Astro G3M678C are now fully supported, with no "(Beta)" tag in the camera picker and no informational banner. I bought both cameras specifically to validate the SDKs end-to-end on my own bench, and both went through the full hardware test: discovery, connection, color preview, RAW8 and RAW16 recording, SER playback in AutoStakkert and PIPP, mid-session format switching, and tight ROIs.
The important architectural shift here is that Beta is now per-model, not per-vendor. Other SVBONY cameras, the rest of the ToupTek family, and every QHY model stay Beta until each one is individually validated against real hardware. They're not feature-limited or broken — the label just means I don't yet have a logged hardware session for that specific model. If you're running one of the still-Beta cameras and something doesn't work, send me a diagnostic log export and that camera moves up the queue.
The 1.2.3 work also fixed two specific bugs the Beta cameras surfaced. Tight ROIs (like 320×240) now apply cleanly on ToupTek cameras — they used to fail with an internal error. And RAW8 ↔ RAW16 format switching now validates the new format with the camera before committing, then rolls back automatically if the camera can't deliver a frame on the new setting.
Reliability and the Smaller Wins
A few smaller things shipped in 1.2.2 and 1.2.3 that don't get top billing but matter day to day:
- Per-channel histogram clipping. Color cameras now show R, G, and B clipping chips above the histogram, and a "Reduce exposure" hint appears when any single channel saturates. Useful on SVBONY color sensors where one channel can clip well before the image overall looks bright.
- Mac no longer goes to sleep mid-capture. Active recording sessions hold a power assertion until the session ends, so the display stays awake and the USB stack doesn't renegotiate the camera connection in the middle of a run.
- Inspector hides controls the camera doesn't expose. Sensor temperature, cooler, USB bandwidth, and high-speed mode now only show on cameras that actually support them.
- Custom diagnostic log folders persist across launches. Pick a folder in Settings → Diagnostics and it stays picked.
Thanks to the Testing Community
The 1.2.x cycle has had more user-driven feature work in it than any release since launch, and I want to name the people who made that happen. All by first name to keep things friendly, all in the order their feedback shaped the builds.
Eli filed the original request for arbitrary Custom ROI dimensions back in April. That request seeded the entire 1.2.0 → 1.2.2 ROI arc, from drag-to-select through the editable draft. JB picked up the Custom ROI from 1.2.0 the day it shipped, told me drag-to-select was "the most useful feature," then walked me through what was still missing in detailed back-and-forth that produced the editable draft, the resize handles, the numeric action bar, and the case for retiring the SHG presets I had originally shipped. He also reported the camera hot-plug bug that's now fixed.
Jim tested 1.2.0 on his 13" MacBook Air and confirmed the reworked layout fits on smaller screens, closing out earlier sizing feedback. He also caught the duplicate "View" menu in the menu bar and flagged the USB 3.0 at 100% bandwidth indicator that used to render as a red warning when it shouldn't have.
Jochen was the first real-world Omegon and ToupTek OEM tester, and his diagnostic logs over a two-week stretch drove three significant fixes: the launch-time ToupTek discovery retry that lets the camera show up without a manual refresh, the cooler-power row that now correctly hides on cameras that don't expose it, and — most importantly — the recording reliability work that turned a header-only 178-byte SER file into a properly written capture. The shared raw-frame envelope pipeline is partly his fault.
Donald caught the UI freeze on large sensors during preview that motivated the Metal-direct preview path, and he also reported the custom diagnostic log folder silently falling back to the default location — both fixed.
Gary ran into external SSD write back-pressure on his 8GB M1 Air with a 3096×2080 ASI178MC and provided the logs that calibrated the back-pressure detection thresholds in 1.2.1.
If your TestFlight session surfaced something that's now fixed and your name isn't above, mail me — that's an oversight I'd like to correct.
What's Next
Three things on the near roadmap that I can talk about. UVC camera support (already spec'd) opens Laminar to generic USB cameras and potentially iPhone Continuity Camera. Capability-driven white balance and camera color controls (white balance R/G/B, gamma, black level) for the backends that expose them. And on-the-fly flat field correction for solar imaging — two independent requests in three weeks, and it's the right feature to target for v2.0.
For now, 1.2.3 should be on the App Store within a few days. Existing user presets, custom captures, and per-camera Camera & Sensor settings carry over.
Frequently Asked Questions
Common questions about Laminar 1.2.3 from the Mac astrophotography community.
Common questions about Laminar 1.2.3 from the Mac astrophotography community.