
This is part one of a two part series on remote imaging in your back yard.

It’s difficult to brave the mosquitos at night. It’s also difficult to stay out in freezing weather for long periods. You want to maximize your imaging time, and you need sleep each night. The best solution to all these issues is to network connect your telescope equipment for remote imaging in the back yard. Once you have your equipment set up, time outside will be minimal, and you can image from the comfort of your own home.
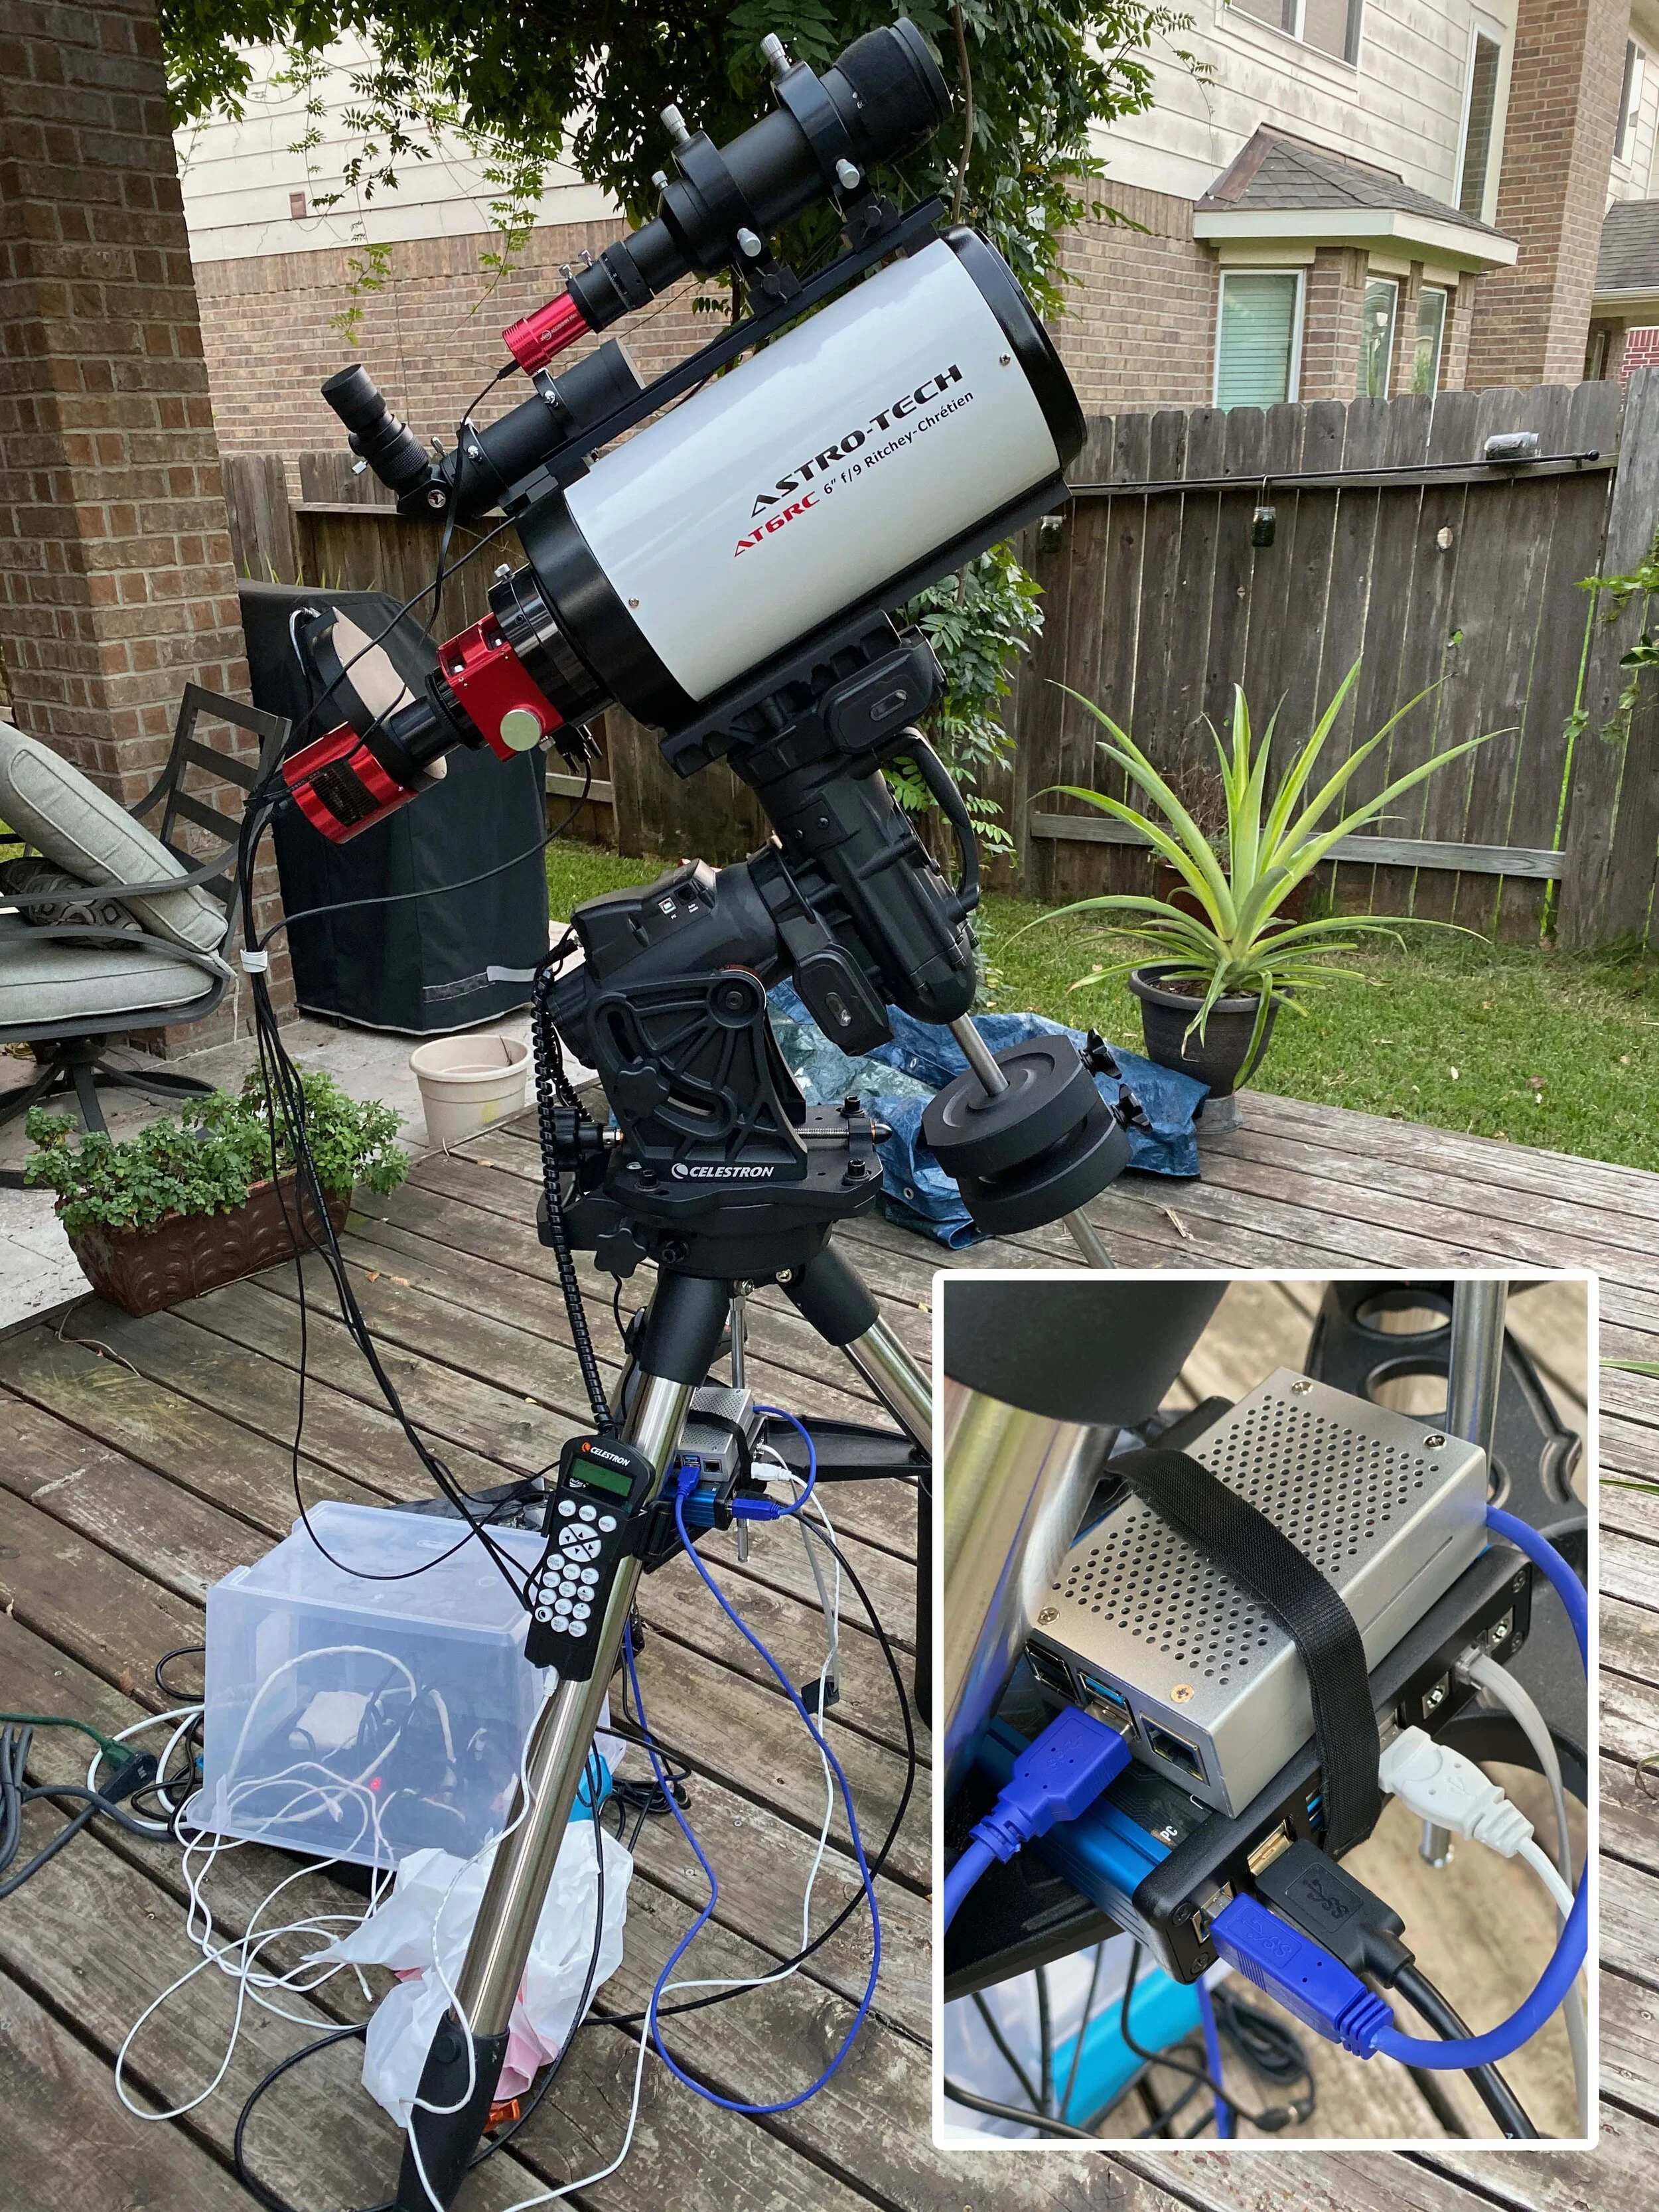
Automation of your telescope equipment is key to making a lot of this work. But even without some elements like a robotic focuser, you can still make due. The one thing you will need though, is a computer that you’re willing to leave outdoors. For my first few years of imaging, I would leave my MacBook Pro 13” laptop outside, and one summer we had an unexpected summer rain on a 0% rain chance. Water did get into the side of my laptop and it shorted out the USB ports and WIFI card on that side of the computer. Thankfully, I was able to get it fixed for less than $100. But that made me rethink my outdoor computer. I settled on a Raspberry Pi4 device. They’re less than $100, and you won’t mind losing it if it gets rained on. It’s certainly better than losing a $2,000 laptop.

Here’s what I got for the Raspberry Pi.
Raspberry Pi4 4GB model $61.71 (at time of writing)
Aluminum case with heatsink and fan $13.99 (at time of writing)
If you prefer, bundles for Raspberry Pi devices are sold that include everything you need to get going. I purchased my pieces separate, because I wanted an aluminum case to help dissipate heat as it’s very warm where I live in the south U.S. Additionally, you’ll need an OS to run on the device. For using the KStars/EKOS imaging package, there’s nothing better than the StellarMate OS. You’ll need to purchase a license of the OS for another $49. If you are more technically inclined, and don’t mind configuring everything yourself, you can use the FREE Astroberry Server on the same Pi unit. If you happen to be really technically challenged, you can forgo all of the above Raspberry Pi stuff, and purchase a StellarMate device instead of the OS for $179. This has everything preinstalled and set up.
Setting up the Raspberry Pi
If you’ve gone the route of purchasing your own Raspberry Pi, and need to install the Stellarmate OS or Astroberry Server, you’ll insert the MicroSD card into your computer directly if it has a slot, or with an adapter if you don’t have one. You’ll need to download balenaEtcher in order to copy the Stellarmate OS image over to your card. Download the image of the OS to your computer, and download balenaEtcher as well. Run balenaEtcher and select the downloaded StellarMate OS image (or Astroberry Server image), select your SD card as the target, and then select Flash.

After a few minutes, the OS is written to your SD Card. When it’s done, eject the card, and put it into the slot of your Raspberry Pi device. Now you can turn it on.
The easiest way I’ve found to configure your new device is to plug in a spare USB keyboard and mouse, as well as an HDMI monitor (you can use any HDMI TV for this too). This is after all, a full 4-core CPU computer. You can alternatively follow the StellarMate first time setup instructions to set it up using the Android or iOS StellarMate apps. But I find it easier to access the device directly using a monitor, keyboard and mouse. I even picked up a small portable 10” HDMI monitor for $100 that I can take with me in case I get in a pinch and need to access the Pi directly when traveling.
When you’re first booted up, you’ll see the screen below. KStars is running! Yes, you can image directly on the Pi device using KStars/EKOS (a bit more on that later). However, In part two of the tutorial I’m going to show how you can run the Pi in server mode, and use KStars/EKOS on your Mac or PC inside the house. This will be less resource intensive on the Pi device, and you’ll be able to use all your screen real estate that you have on your desktop computers.

First boot! Right into your astro imaging program KStars/EKOS. You don’t need this now, so you can close it by clicking the X in the upper right hand corner of the program window.

Access the WIFI menu at the top right hand side of the window.

Select “Disconnect” to disconnect from the stellarmate WIFI.

Your home WIFI network should now appear. Select it.

Now type in your WIFI password to connect to your WIFI network inside your home.
With the StellarMate OS installed, and the device connected to your home network, you can now access it through your Mac’s built in VNC (Virtual Network Computer). Alternatively PC and Mac users can connect through a web browser at the following address: http://stellarmate.local:6080/vnc.html. (The VNC password will be “smate”) This allows you to see the Raspberry Pi units screen directly in a window on your Mac. You can then control the device using your desktop or laptop computer instead of directly accessing it with it’s own keyboard and monitor. The benefit of connecting through the Mac’s built in VNC is that you will also have access to shared drives on the Pi unit, making it easy to transfer images to your desktop for processing.
Here are the steps to access it through the Macs built in VNC:

Open a Finder window. Look in the left hand column for Network. Select that. You’ll now see a list of computers broadcasting on your home network. stellarmate:0 is there. Double click it.

This opens a finder window of the device, and it’s shared drives. None are being shared from the Pi unit yet, so no drives appear. But there is a Share Screen button that appears. Click that.

Put in your Stellarmate password. The default is “smate” without the quotes. Press Sign In.

Ta da! You are now seeing your Raspberry Pi desktop on your Mac computer. To do this on a PC, you would need to download FreeVNC or something similar to connect to the device or use the provided web address in your browser as I linked above in the article.
Configuring your Raspberry Pi and the KStars locale and time information
Lets now make sure your Raspberry Pi has the correct localization information for your location.
Go to the StellarMate Icon in the upper left, and open up the menu to Preferences, Raspberry Pi Configuration.

Select Raspberry Pi Configuration.

Select the Localization tab, and set each of the 4 settings according to where you live. I live in the North America Central time zone, so I chose America/Chicago for my Timezone.
You will be asked to reboot after the settings are done, and you press OK. Reboot should happen automatically. Make sure you reconnect over VNC to the device. If you left your Mac VNC window open, it will reconnect automatically. Your time in the upper right corner of the Raspberry Pi device should now show the current accurate time for your location.
Now to configure KStars/EKOS location and equipment profile so that you can image with your Raspberry Pi unit over VNC from the comfort of your home.
Your computer should have booted up to KStars. If not, launch KStars from the desktop KStars icon.

The two (highlighted in red) icons, allow you to set the geography and time for the KStars planetarium program. It’s important to set this, as EKOS will utilize this information to make sure you GO TO the correct locations for objects.
Lets start with Geographic location. Press the globe icon. Type the closest city to your location in the city filter. This will be good enough. You can alternatively type in your home location with Latitude, Longitude, and elevation information that you get from a GPS device or your Phone.

I’ve picked Houston, as this is close enough to my home location (about 8 miles off).
Press OK, and now select the clock Icon to set the time for the planetarium program. Note: It’s best to set it to now for imaging purposes, but if you want to look at where objects might be in the future, or past, you can change the time to another date. Just don’t forget to set it back to now.

I pressed the Now button. This sets the planetarium clock to the current date and time. The time should now match the Raspberry Pi’s time in the upper right corner of your screen. If it does not. Then either in your Raspberry Pi preferences, or Geographic location in KStars is incorrect, and you need to double check your settings.
Final Step: setting up an equipment profile for your telescope equipment.
We’re going to now launch EKOS, the imaging suite that is within KStars. Look for the Observatory Dome icon in the top bar of KStars (indicated in red on the below screenshot). This toggles the Ekos window. Since we’ve never launched it before, it’s going to go right into the automatic profile wizard to select your telescope equipment.

Press the Next button.

Select “Equipment is attached to this device”.
In part two of this tutorial, I’ll show you how to use this device as a remote device, and you’ll learn how to use the other option to image on your desktop instead of the Raspberry Pi unit.

Give your profile a name. Select Internal Guider, and then Create Profile and Select Devices.
This profile will represent one set of equipment that you might image with. So name it after the equipment you might have connected. For instance. I have several telescopes and mounts. This profile will be set up for my AT6RC telescope and CGX mount. Later I might make a second profile for a different scope and same mount, or different combinations of hardware. Choose the internal guider for simplicity. It’s very good. If you have special circumstances where you need a more control over your guiding, you can choose to use PHD2, but I’m not covering how to set that up here. Finally, create the profile, and choose the rest of your equipment.

Select your equipment here. My setup uses a Pegasus Astro Ultimate Power box for focusing, and it’s considered an Auxiliary device. So I select it under Aux:1 instead of Focuser. But if you have a dedicated focuser and don’t use the UPB, then you’ll choose it under the focuser section. If no focuser, just leave it blank. I would also add a free Weather service, as Ekos can automatically shut down your equipment if rain approaches.
The final step here is to add your telescopes. This includes primary and guide scopes. Make sure when filling out focal length, you take into account any reducer you might be using as part of the focal length for that particular scope. The Eyepiece, Lens, and Filter sections do not matter here. You also do not need to choose a driver for the telescope. Leave that blank.

I’ve added my telescope and guide scope for this profile. You can add all the telescopes and guide scopes you own here now if you wish, because once they’re added, you can then create multiple profiles and not have to add the scopes again.

Now, all my equipment has been added, and I can save this profile.
The EKOS window should now appear with your currently created profile selected. Connect all your equipment indoors to your Raspberry Pi unit during the day so that you can test and configure your drivers that are built into EKOS.

This is the main EKOS window. Start and stop the connection to your equipment from the #2 section of icons near the top. Pressing the play button connects to the devices plugged into the Pi like your camera, and telescope mount.
After pressing the play button, the INDI control panel comes up so you can set individual settings per device. This is where you would set your default gain, color depth and more for your camera. Set your park position for your mount, focuser backlash settings, and filter wheel slot labels and more with each tab.

All individual equipment settings are done from the INDI control panel. Make sure every device is configured correctly and works. You’ll see connection errors at the bottom of each tab indicating whether or not the device is working.
Close the window, and now you’re ready to start imaging remotely over VNC to your Pi device. Follow one of my other tutorials for the steps to take when imaging and you’ve got all your equipment set up and working with EKOS.
An overview of all the modules in EKOS. This will give you an idea of the functionality within EKOS. Some new functionality has been added to EKOS since I wrote this article. It now includes an Observatory tab where you can monitor the current weather conditions and set automatic shutdown conditions in the case of bad weather.
A tutorial on running the modules. In my example, I capture images of the Wizard Nebula.
Now, all you need is clear skies. Set up all equipment outside. Connect all your devices to the Pi device, and boot it up. Connect over your network using VNC to the Pi and open up EKOS to connect to your hardware, and start the imaging session.
In part two. I’ll show you how to configure the Pi device to act as a server instead of the main imaging computer. And you’ll be able to run KStars/EKOS on your Mac or PC desktop computer inside your home. I’ll also cover some better connectivity options like a Powerline adapter that you can use to get Ethernet to the Raspberry Pi instead of using WIFI.