

The Pegasus Astro Ultimate Powerbox V2.
There’s a few reasons I’ve made some resent upgrades to my equipment. A few weeks ago I had set up for a night of imaging. I religiously check the weather for any incoming rain, and if there’s even the slightest chance I don’t image. Well, this particular night It was crystal clear, no chance of rain. I set up the imaging rig and went to bed for the night. I woke up with my regular alarm at 6:00am, and looked out the window. It was raining! A lot! A stray summer shower had come through (the first time in 3 years of imaging). I jumped out of bed and went to the back yard. I could see my Mac Pro laptop sitting in the concave chair next to the scope in about an inch of water. Everything was wet. I immediately yanked the power out of the wall under the porch covering before I walked out to the scope.
The damage had been done, and all I could do was dry stuff off, and bring it indoors. The computer power adapter was burned out, the mount power adapter was burned out, the usb hub was fried, and the laptop wifi module was burned out. Thankfully that was the extent of the damage. Somehow the cameras, scope and mount made it out ok. I took the laptop to Apple, and they wanted $750 to repair anything they found wrong. But the technician was nice enough to open it up, and take some photos. He showed me where the WIFI module had burned out, you could see traces of residue from the water. I decided I could fix the WIFI module myself after looking at an IFIXIT article on repairing it. It was around $85, so I did fix it myself, and it works great now.
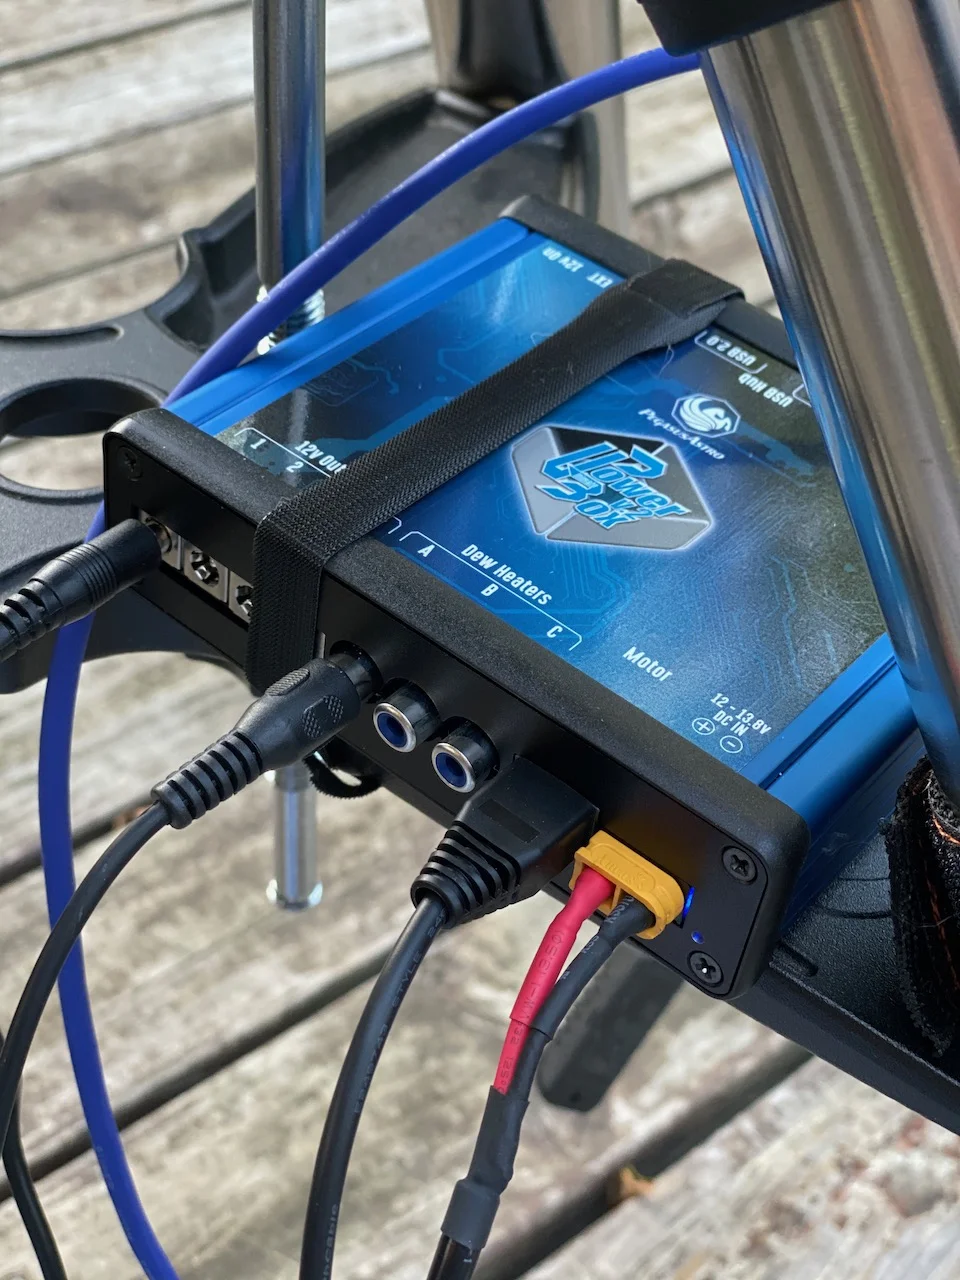
This brings me to my upgrades. I had a rats nest of cables and power bricks. More than would fit into your typical power strip. Pegasus had recently released their Ultimate PowerBox V2, it’s got power for up to 4 devices, 6 USB ports (4 USB3, 2 USB2), a focus controller, and 3 dew heater outlets, as well as humidity and temperature monitors. All controlled from a single box. I ordered one and set it up with Kstars/EKOS. All my cameras and my mount are plugged into it. I also hooked up the Moonlite focus motor to the controller output of the UPBV2, hooked up my dew heaters too.
This one device does so much, I was able to get rid of the following:
Focus controller
Focus a/c adapter
USB hub
USB hub a/c adapter
Dew Controller
Dew controller a/c adapter
Camera a/c adapter
Seven items that I had to hook up every night, now replaced with one piece of hardware. AWESOME. What a way to simplify things. Especially if you set up and tear down every time you image.
This brings me to my second upgrade. I’ve adopted a Raspberry Pi 4 device as my new computer server at the mount. I bought this nice aluminum case for it too. I still run KStars/EKOS. I also still use my Mac Book Pro to set up the telescope and align it every night, but now I don’t need to leave my $1900 MacBook Pro outside where it has the potential to be destroyed by rain. The Pi device starts at $30 for the RPI3, but really, you should spring for a little more and get the RPi4, the newest, fastest Raspberry Pi device. I can easily replace a $60 computer if rain strikes again. The best part, is since it runs KStars/EKOS server, I can still run the KStars/EKOS client on my Mac inside the house.

The Raspberry Pi 4 running Stellarmate, and connected to the Pegasus Astro Ultimate Powerbox V2.
In the photo above, you can see my Pegasus UPBV2 (the blue box) with the Raspberry Pi 4 sitting on top. I start the night aligning my telescope using Cloudmakers AstroImager so I can see the alignment stars while I run Celestron’s ASPA routine on the handset. Then I unplug the blue USB from the laptop and plug it into the already booted RPi4 device. Go inside to my Mac and start KStars/EKOS and start imaging.
For the Raspberry Pi device, I bought a copy of the StellarMate OS, so that it’s easy to set up and run KStars/EKOS. The Pi4 device is fast enough now that you can actually VNC in with the Mac’s built in screen sharing and run KStars/EKOS right on the device, or you can run the server on it, and then connect from your Mac desktop. it’s been great. Very reliable, and now, with a little bit of additional weather proofing (covers over the electronics, and a box to get them off the ground) I can image without the fear of rain ruining everything.

I took this image around 10pm, about an hour after twilight. Look at that sky! That’s light pollution! It looks like daylight. This is what I have to deal with when imaging.
